In today’s digital age, capturing screenshots has become an essential part of our daily lives.
Whether you want to save important information, share something interesting with others, or troubleshoot technical issues, taking screenshots can be incredibly useful.
If you’re a Mac user with a Logitech keyboard, you’ll be pleased to know that Logitech keyboards are fully compatible with Mac and come equipped with designated keys that are mapped to macOS shortcuts, including the ability to take screenshots.
In this article, we will explore the various methods to take screenshots on a Mac using a Logitech keyboard, along with additional customization options.
To take a screenshot on your Mac using a Logitech keyboard, follow these steps
If you want to screenshot a specific portion of the screen, press the Shift + Command + 3 or Shift + Command + 4 keys simultaneously
Alternatively, press Shift + Command + 4 + Spacebar to capture a particular element.
Once you’ve taken the screenshot, press Shift + Command + 5 to view it.
How To Screenshot From A Logitech Keyboard
Table of Contents
How to Take a Screenshot on a Mac with a Logitech Keyboard?
All Logitech keyboards are Mac compatible and have designated keys that are mapped to macOS shortcuts. You will be able to take a screenshot on your Mac by using shortcut keys in a certain combination.
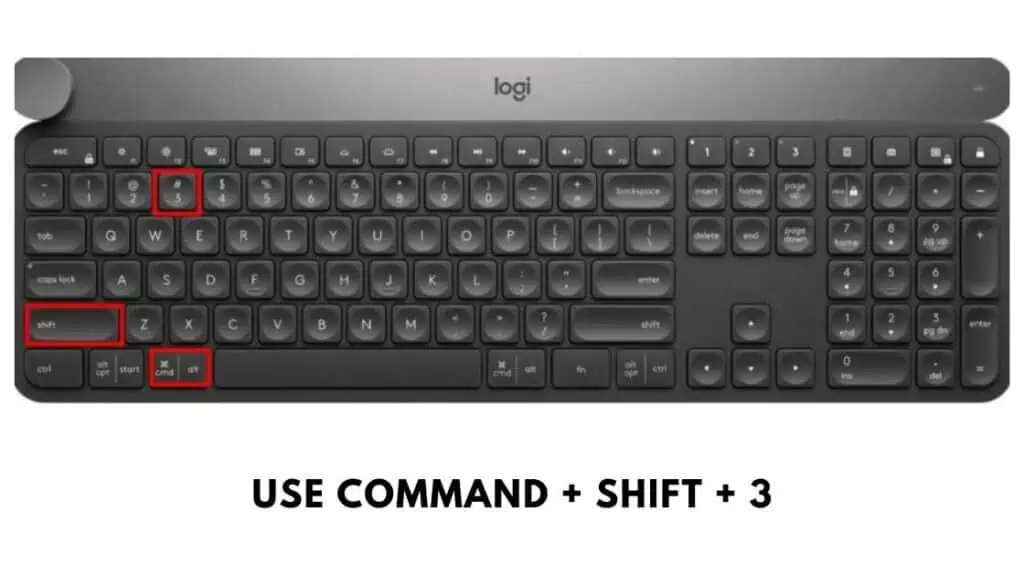
For example, Mac users are able to take a screenshot of a portion of the screen by pressing Shift + Command + 3 or Shift + Command + 4. You can also use Shift + Command + 4 + Spacebar to screenshot a certain element or Shift + Command + 5 after taking the screenshot, to view it.
- Shift + Command + 3 — Navigate to the page you want to take a screenshot of and press the Shift + Command + 3 at the same time and release them when the camera snapshot sound is heard. The screenshot will then be saved on the desktop.
- Shift + Command + 4 — Navigate to the part of the screen you want to capture and press Shift + Command + 4 on your Logitech keyboard to turn the mouse cursor into a crosshair icon. Drag the icon over the portion of the screen you want to capture and then release the mouse button.
- Hold down Space to drag the frame somewhere else
- Hold down Shift to drag one end of the frame at a time
- Hold down Option to lock the center of the frame
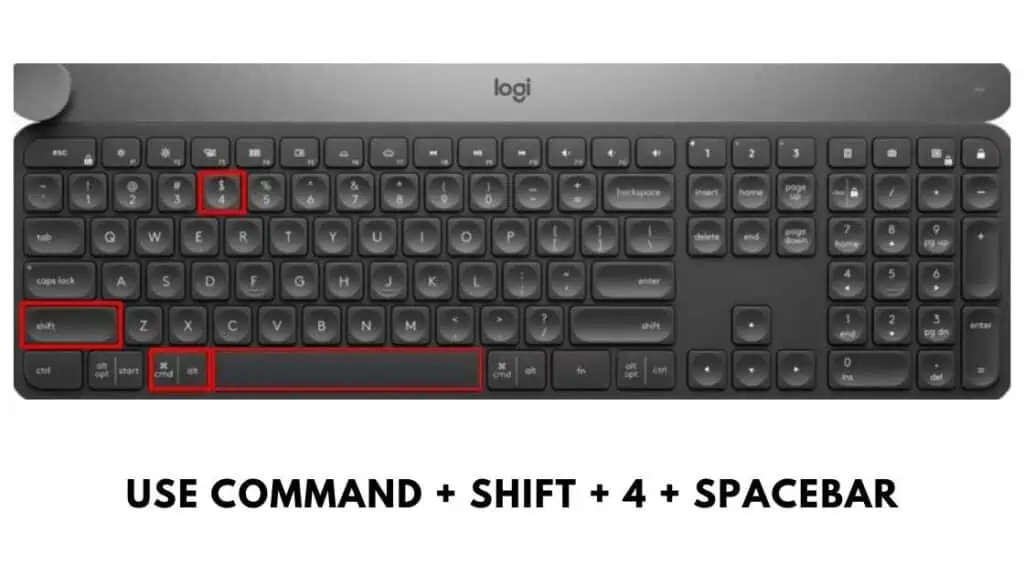
- Shift + Command + 4 + Spacebar — This shortcut turns the mouse cursor into a camera icon and you can then select a specific window if there are multiple opened at the same time
- Shift+ Command + 5 — Pressing this combination of keys will open the folder where all the screenshots and video grabs are stored.
How to Copy a Screen to the Clipboard using a Logitech Keyboard?
Sometimes, you may want to capture a screenshot and paste it directly into another application instead of saving it to your desktop. To achieve this using a Logitech keyboard, follow these steps:
- To capture the entire screen and copy it to your clipboard, press the Command + Control + Shift + 3 keys simultaneously. The screenshot will be copied to the clipboard.
- To capture a specific portion of the screen and copy it to the clipboard, press Command + Control + Shift + 4. Then, use the crosshair icon to select the area you want to capture. Once selected, the screenshot will be copied to the clipboard.
After capturing the screenshot to the clipboard, you can paste it into any application, such as Photoshop, Microsoft Word, or Google Docs, by pressing Command + V.
How to Remap a Logitech Keyboard to Support macOS Shortcuts?
While most modern Logitech keyboards are already compatible with macOS shortcuts, some older models or keyboards initially designed for Windows may require remapping to enable proper functionality on a Mac.
If you find yourself in such a situation, you can follow these steps to remap the keys on your Logitech keyboard:
In short – yes, you can remap keys on the keyboard, but it’s a two step process.
First you will have to use the Logitech Options app on the Mac with the keyboard connected and then use the built-in keyboard modification tool that’s found in the Settings app on the Mac.
Disable the Standard Windows Function Keys with Logitech Options
You can use the Logitech Options app to change the shortcut keys on your keyboard and use macOS function keys instead of Windows function keys.
To remap the keyboard using Logitech Options;
- Start by connecting the keyboard to the Mac
- Proceed to launch a web browser and navigate to the Logitech Options Customization Software download page
- Click on the Download for macOS 10.15 or later button
- Install the app and wait for the app to load
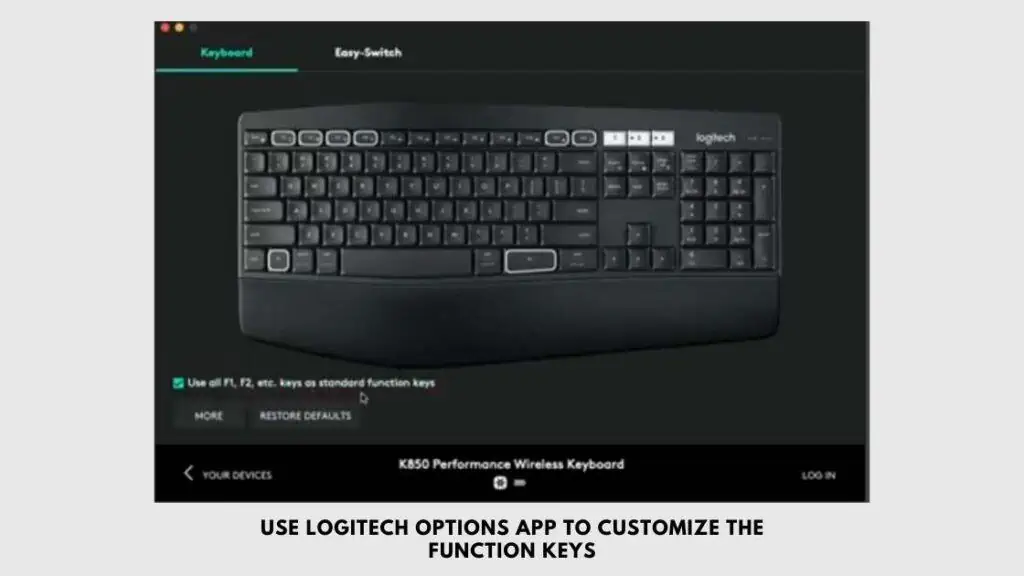
- Now, launch the Logitech Options app on your Mac and sign into your account
- The app will automatically detect any Logitech mouse or keyboard that’s connected to the Mac
- Select the keyboard and then uncheck the following box
- Use all F1, F2 keys as standard function keys
- Then Save
Unchecking the box will permit you to use the Command, Shift and Control keys as standard function keys on your keyboard.
Now that you have disabled the Windows Function keys, proceed to the second step to remap the keys on your Logitech keyboard.
Remap the Logitech Keyboard using the Keyboard Modification Tool on Mac
- Open System Preferences by tapping on the Apple icon on the Mac and then click on System Preferences.
- System Preferences is changed to System Settings on macOS 13
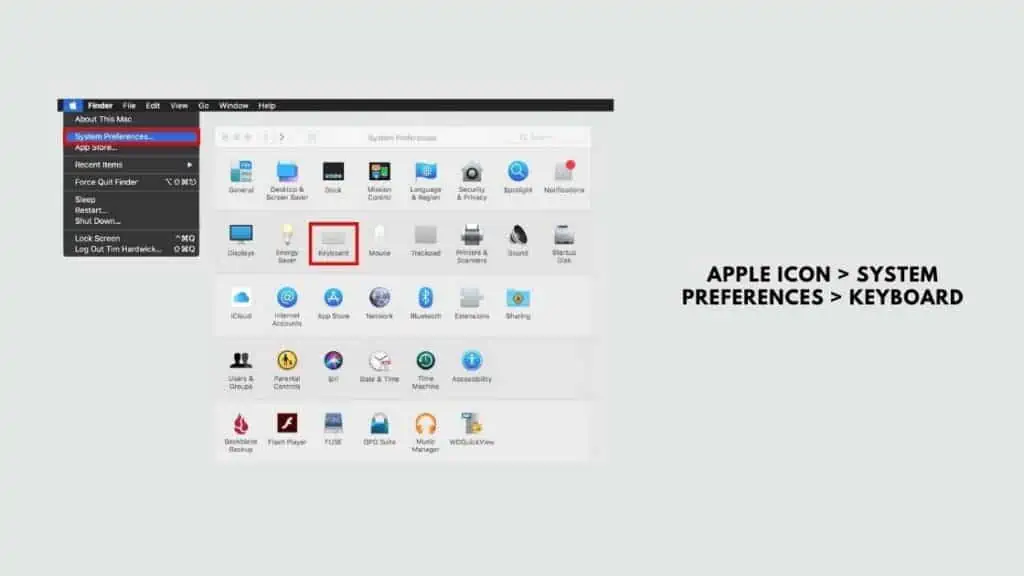
- Locate Keyboard from the list of options and click on it.
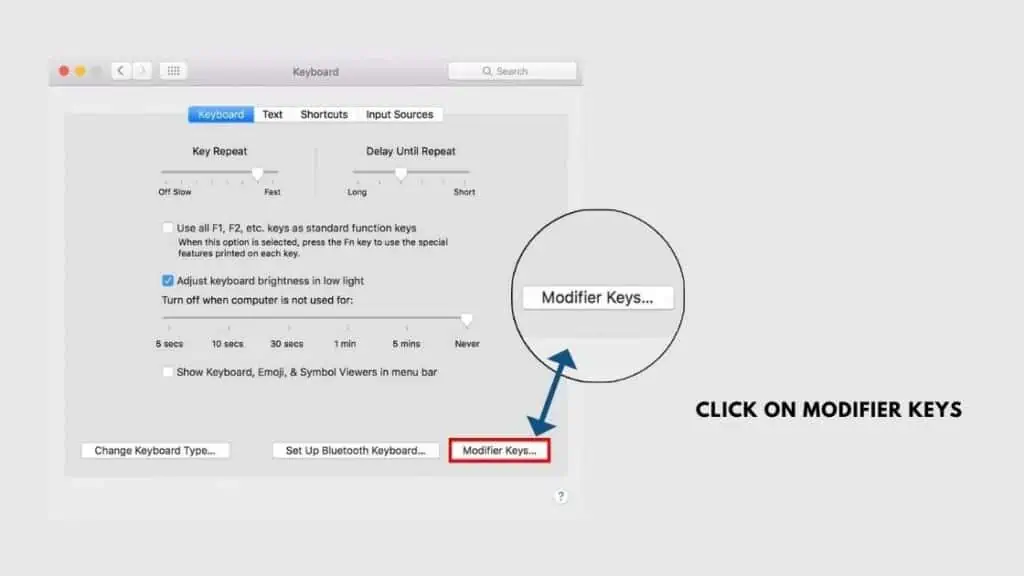
- Once the keyboard settings box opens, click on the Modifier Keys button at the bottom left of the window
- Select the keyboard form the pop up box
- Mac will automatically read the devices that are connected it and will populate them in the Select Keyboard field
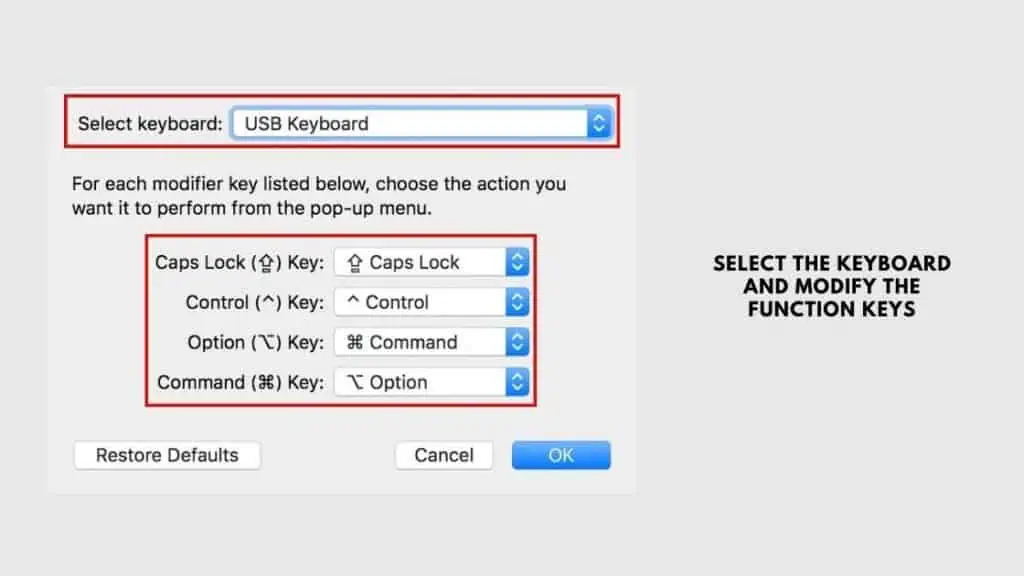
- Now, go ahead and change the mapping for the placement of the following keys
- Caps Lock key
- Ctrl Key : Control key
- Alt Key : Option key
- Windows Key : Command key
- Once done, click on the OK button to save the settings
How to Change the Logitech Keyboard Shortcuts to Take a Screenshot?
If you’re finding it difficult to take a screenshot on your Logitech keyboard and want to change the key selection so you can use one hand instead of two to take a screenshot, macOS has a way for you to do just that.
- Tap on the Apple icon and then click on System Preferences
- Now locate keyboard and then click on the Shortcuts tab
- Select Screenshots from the list of shortcuts in the left panel
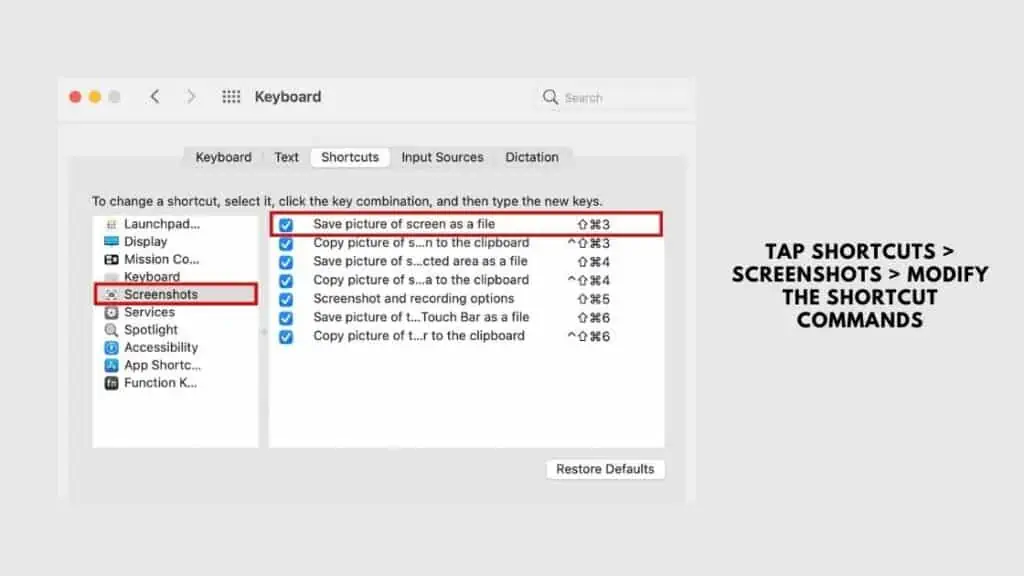
- Tap on the screenshot shortcut command you want to modify
- Press and hold the keyboard combination you want to use to replace that shortcut and it will appear in place of the old shortcut combination
- Close the window and try using the new shortcut you created and see if it takes a screenshot on the Mac.
How to Take a Screenshot on an iPad with a Logitech Keyboard?
Logitech also offers a range of keyboards designed specifically for iPad users, and these keyboards are compatible with iPadOS shortcuts.
If you own one of these Logitech keyboards, you can use the following shortcuts to capture screenshots on your iPad:
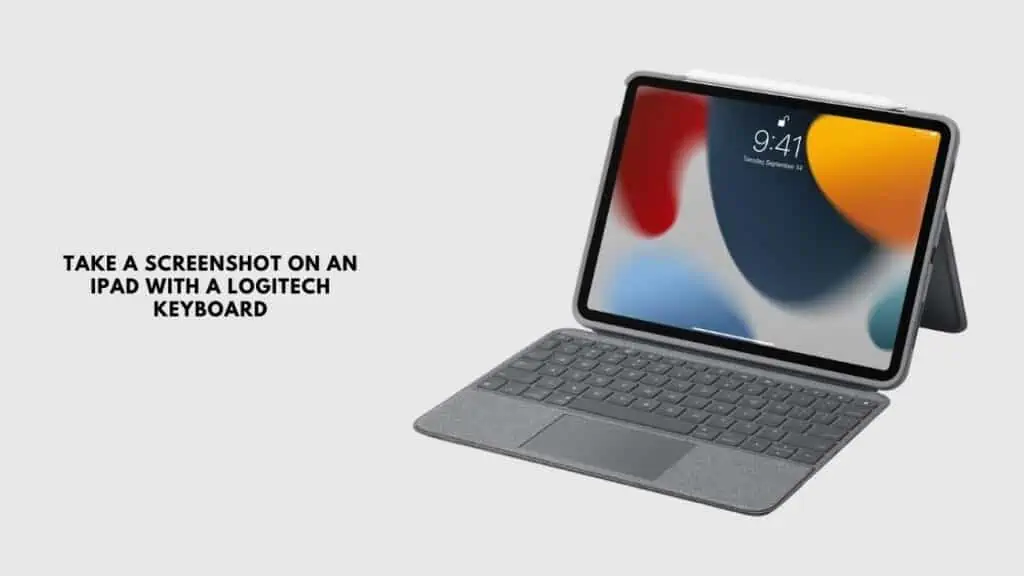
These commands work on the following Logitech keyboards for iPad’s: K380 Multi-Device Keyboard, K480 Bluetooth Keyboard, Logitech Slim Folio, Rugged Folio, Combo Touch, and the Folio Touch.
- Command + Shift + 3 — Take a screenshot of the open window on the iPad
- Command + Shift + 4 — Take a screenshot and immediately open Markup to view or edit it.
Markup lets you modify screenshots and add annotations to the images. You can even add signatures, shapes, magnify the screenshot on the iPad.
How to Customize Screenshot Shortcuts on an iPad Logitech Keyboard?
To customize your Logitech keyboard shortcuts on an iPad, follow these steps:;
- Open the Settings app on the iPad and then tap on Accessibility
- Now, navigate to the Keyboard option and click on it
- Tap on Full Keyboard Access and enable it
- Click on Commands and then tap on a command you want to change
- Press and hold the new key combination you want to assign to that command and then tap on Done to save the new configuration
How to Take a Screenshot on Mac with Different Logitech Keyboards?
How to Take a Screenshot on Logitech MX Keys for Mac?
To take a screenshot on a Mac using the Logitech MX Keys for Mac, you can use the built-in macOS shortcuts.
Pressing Shift + Command + 3 captures the entire screen, while Shift + Command + 4 allows you to select a specific portion of the screen to capture.
After pressing the shortcut keys, you will hear a camera snapshot sound, indicating that the screenshot has been taken. The captured screenshot will be saved on your desktop.
How to Take a Screenshot on Logitech Craft?
The Logitech Craft keyboard provides the same functionality as the Logitech MX Keys for Mac.
You can use the Shift + Command + 3 shortcut to capture the entire screen or Shift + Command + 4 to select a specific portion of the screen.
The captured screenshots will be saved on your desktop.
How to Take a Screenshot on Logitech K380 Multi-Device Bluetooth Keyboard?
The Logitech K380 Multi-Device Bluetooth Keyboard allows you to connect and switch between multiple devices seamlessly.
To take a screenshot on your Mac with this keyboard, you can use the same macOS shortcuts.
Press Shift + Command + 3 to capture the entire screen or Shift + Command + 4 to select a specific portion.
The screenshots will be saved on your desktop as usual.
How to Take a Screenshot on Logitech K780 Multi-Device Wireless Keyboard?
The Logitech K780 Multi-Device Wireless Keyboard, similar to other Logitech keyboards, supports macOS shortcuts for capturing screenshots on your Mac.
Press Shift + Command + 3 to capture the entire screen or Shift + Command + 4 to select a specific portion.
The screenshots will be saved on your desktop automatically.
How to Take a Screenshot on Logitech Wireless Solar Keyboard K750?
The Logitech Wireless Solar Keyboard K750 is also compatible with macOS shortcuts for capturing screenshots.
Use Shift + Command + 3 to capture the entire screen or Shift + Command + 4 to select a specific portion of the screen.
The screenshots will be saved on your desktop folder as usual.
How To Screenshot From A Logitech Keyboard : FAQ’s
Can I use the PrtSc button on my keyboard to take a Screenshot on Mac?
Unfortunately, the PrtSc button can only be used on Windows systems and not Macs or those running on Apple’s OS. You will have to use the Shift + Command + Number keys to take a screenshot on a Mac.
Can I remap a Logitech keyboard for Mac?
Yes, you can remap a Logitech keyboard to support Mac shortcuts and functions. You can do this by either downloading the Logitech Options app or if the keyboard supports macOS, then use the keyboard modifier tool in the System Preferences tool on the Mac.
Also Read:
- How To Turn Off Keyboard Sound On iPhone
- How to Delete Multiple Contacts on Your iPhone
- How To Remove, Add Or Edit Bookmarks on a MacBook
Alan Urban is the Editor-in-chief of Stupid Apple Rumours and often proclaims that he’s ” Apple’s number one fan.”
In addition to keeping up with the latest Apple news, he also reviews Apple products and creates user-friendly guides. When not subjecting Apple Devices to crazy stress tests, he’s usually playing games on Apple Arcade

