The microphone on the MacBook Pro and MacBook Air is an essential component for many tasks, such as video chatting, recording audio, and using voice assistants.
Knowing where the microphone is located is important for using it effectively and troubleshooting any problems that may arise.
This article will provide a comprehensive overview of the location of the microphone on the MacBook Pro and MacBook Air, including the 2023 models.
We will also discuss some troubleshooting tips for common microphone problems.
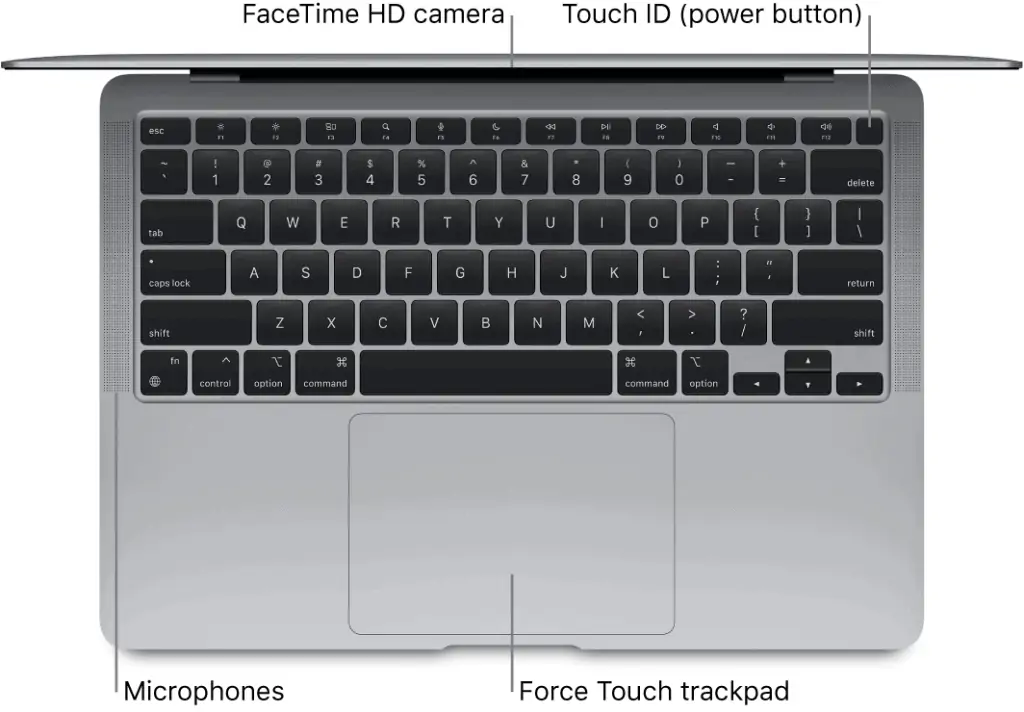
The microphone on the MacBook Pro and MacBook Air is located under the speaker grille. The new models have a three-mic array with high signal-to-noise ratio and directional beamforming, which means that it can pick up your voice clearly even in noisy environments.
Check out the latest Macbook on Amazon!
Where is the Microphone on the M2 Macbook Pro & M2 Macbook Air?
Table of Contents
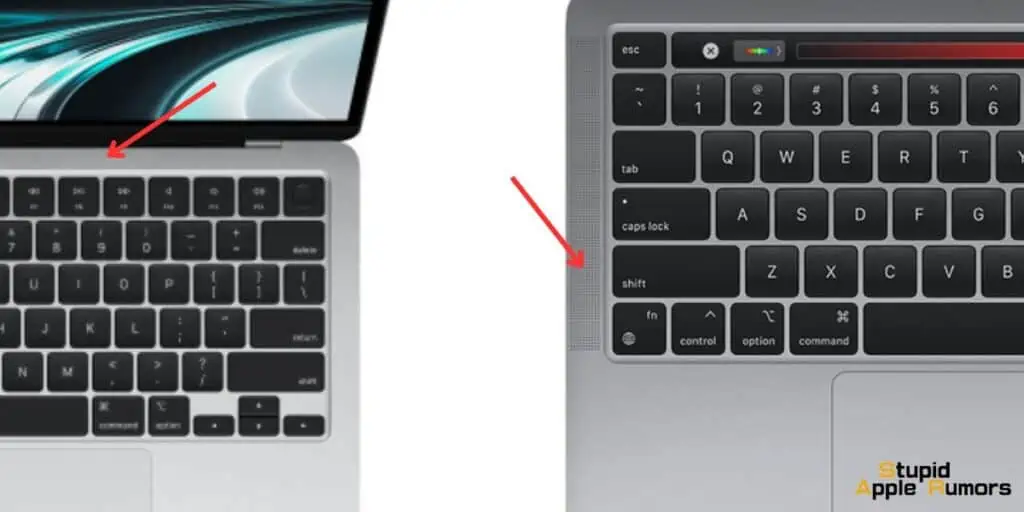
The microphone on the 2023 M2 MacBook Pro and M2 MacBook Air are positioned differently when compared to their earlier counterparts. The M2 MacBook Pro has its microphones located under the speaker grille.
Whereas the 2023 M2 MacBook Air has its microphones under the grille at the top, just above the Function keys.
Both laptops feature a three-mic array with high signal-to-noise ratio and directional beamforming, which means that it can pick up your voice clearly even in noisy environments.
Where is the Microphone on MacBook Pro – M1 and Earlier
Locating your microphone on your MacBook Pro can be hard if you are looking at the wrong place. With the MacBook Pro having multiple microphones, it only makes it harder.
The location of microphones on MacBook Pros has changed over time so the location varies depending on the version/year of MacBook Pro you have.
The recent generations of MacBook Pro have three microphones. You might be mistaken to think that there might be one near the camera, but it is not the case. Microphones on MacBook Pros have always been situated on the bottom casing, near the speakers, or on top of the keyboard area.
While it may seem to be counterproductive because of the sound from speakers or keyboards, Apple thinks these are the best locations for microphones on their most premium laptops, the MacBook Pro.
They are all located in the upper right portion of the keyboard and speakers section of the MacBook Pro. You can see it for yourself below.
The yellow circles indicate the position of microphones on the MacBook Pro and the red boxes are the speaker location.
Even older MacBook Pro 15” models have had their microphones under the left speaker casing, but as you travel back in time, the number of microphones reduces with older models having just one or two microphones. The number of microphones depends on the year of the MacBook Pro you have.
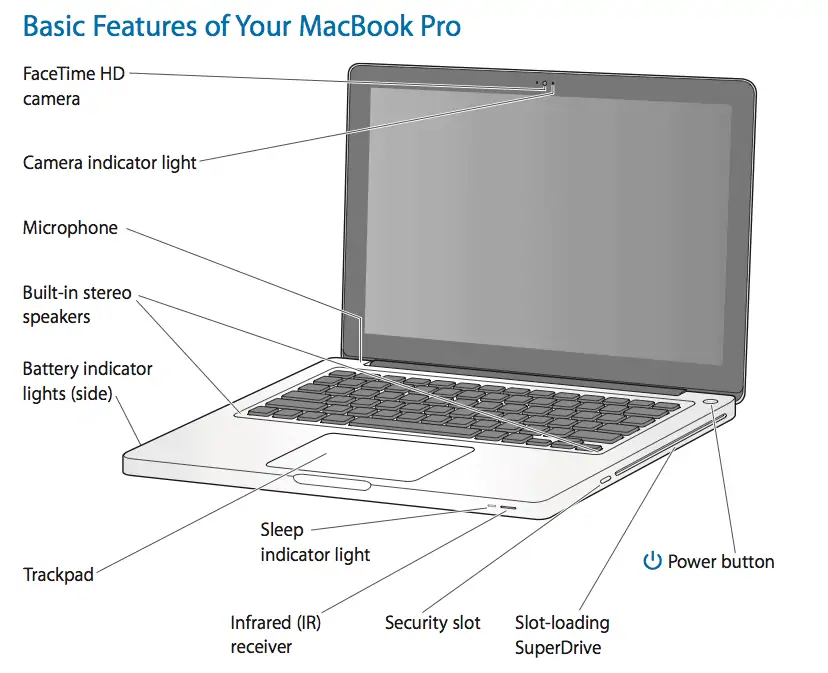
Older MacBook Pro 13” models, like the ones before 2017 haven’t had any speaker grilles, and these laptops are smaller than their counterparts too. On these models, you can find the microphones situated above the ESC key, inside the casing.
You can identify a series of tiny holes under which the microphones are situated. The 13” MacBook Pros had only one microphone before 2017, the newer ones have a similar setup to their larger 16” siblings.
Knowing the locations of these microphones can aid you in meetings, as you can direct your speech towards the microphone location and it will make it easier for the person on the receiving side.
Where is the Microphone on the MacBook Air – M1 and Earlier
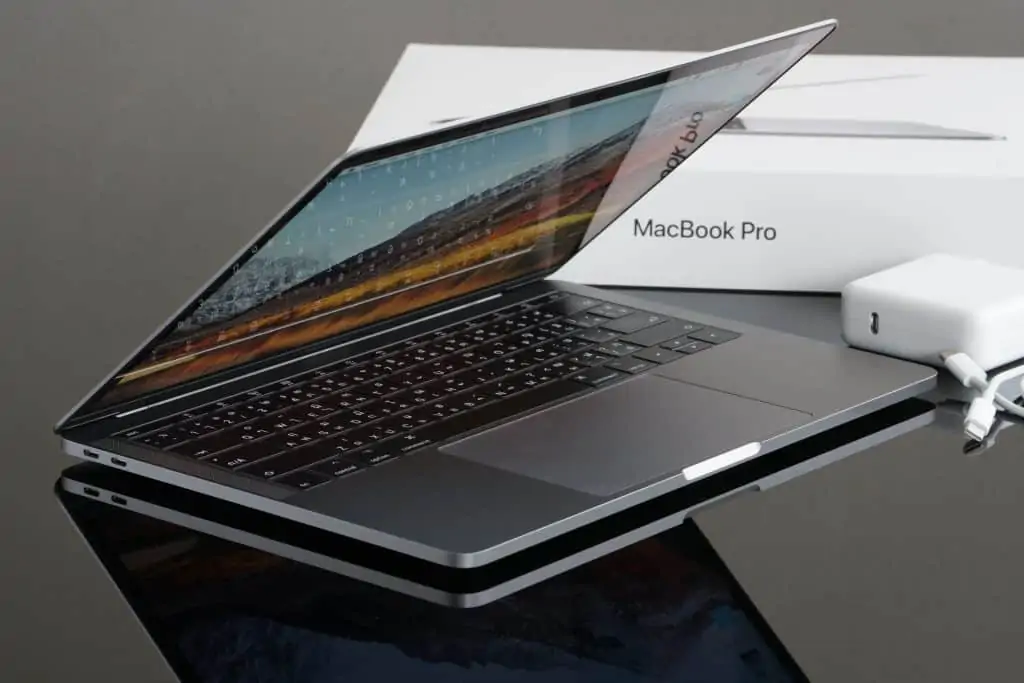
Apple’s MacBook Air features a microphone too. Since the MacBook Air is more about being as sleek as possible, Apple includes only one microphone in it. So, Where is the Microphone on Macbook Pro & Macbook Air? Read on to find out.
If you are someone with a newer MacBook Air, then you will find the microphone under the left speaker grille.
On the other hand, older MacBook Airs have had their microphones on the left side too. But they were located right in front of the 3.5 mm headphone jack since there was no speaker grille to hide them.
If you can’t still locate the microphone on your MacBook, or if I have missed the location for any model of MacBook, then you can find the microphone location using this trick. Hope you were able to find where is the microphone on a MacBook Air.
Turn the microphone on, and turn down the sensitivity of the microphone in the settings. Tap on your MacBook gently, and when the volume meter spikes the most, then you are probably very close to the microphone location. Now you can look for any microphone holes near it.
What are the Benefits of using the Built-In Microphone
Microphones are synchronous with singing and the first thing that comes into my mind when I think of microphones are the ones that are used by singers on stage. The ones with a round head and long wires running from their backs.
A microphone is a device that can capture sound and reproduce it so that a computer or a piece of software can understand it. The on-stage microphones focus on performance above everything, hence they are large and can seem unwieldy. On the other hand, phones and laptops need microphones that are tiny yet perform decently.
Microphone technology has become quite a lot better over the recent years, making microphones tiny yet they reproduce sound a lot better. Microphones on MacBooks and smartphones are tiny enough to make them hard to find but can put some high-quality microphones from yesteryears to shame.
In-built microphones in MacBooks don’t mess with the aesthetics of the laptop and gather sound very well. MacBook Pros have 3 microphones to make sure they collect the sound as best as possible. You can use these microphones to record high-quality podcasts too, they are that good.
Apart from that, streaming games/videos, professional meetings, and video calls to loved ones all benefit from the high-quality inbuilt microphones in MacBooks.
In-built microphones like the ones in MacBooks are also lightweight, don’t add any bulk and you can’t lose them by mistake either. They are developed with your convenience in mind and are always available if you need them, making them a great addition to MacBooks.
Bar professional sound recording, you wouldn’t need anything more than your MacBook microphones, they are so good. And if you need professional-quality sound, you can always invest in a professional microphone and connect it to your MacBook.
The built-in microphone on MacBooks is great for simple tasks like video calls, phone calls, gaming, voice chats, or even use it for singing into and recording music.
How To Get The Best Out Of The Macbook Air Mic
Although the microphones on MacBook Airs have always been excellent, there are instances when you need to make a few adjustments to get the greatest sound for your needs. The noise-ambient reduction setting needs to be turned on when you’re in a noisy setting.
You may modify the microphone volume for each app on a MacBook Air. Let’s examine how the MacBook Air’s microphone can be improved.
Adjust volume settings – Select Input from the Sound menu in System Preferences (System Settings on macOS Ventura and higher). By moving the slider to the right or left, you can modify the microphone’s output loudness. The microphone becomes more perceptive to sound when slid to the right. To assist reduce background noise, you check the Ambient Noise Reduction checkbox. You can change the mic volume in a pop-up window by clicking the volume symbol in the menu bar.
Remove Obstacles – The mic on the 2020 MacBook Air and earlier models can be harmed by objects placed close to the device. Sound recording on the mic can be enhanced by taking the casing off. Since the microphone and speakers are located between the keyboard and display in the 2022 model, this is not necessary.
Do a mic test – Launch QuickTime Play, create a new audio recording, and start speaking or singing. By playing back the audio and making the necessary adjustments, as previously said, you can hear how everything sounds.
Place your Microphone Correctly – Your voice will sound louder if you move your MacBook Air closer to you, but you shouldn’t move it too close because the sound may become distorted. The distance should be sufficient for video callers to see you, but close enough for your voice to be audibly heard.
Clean your Mac – You may only need to clean your MacBook Air occasionally to see an improvement in the mic output. Before starting, turn off the device, and make sure water doesn’t get near the ports. Utilize only advised goods, such as a tidy, lint-free cloth.
Use a USB microphone – The MacBook Air’s inbuilt microphone is excellent, but if your project requires a little more, use an external USB microphone. Similar to an internal microphone, a USB microphone includes movable parameters that you can alter as necessary.
Adjust In-App Settings – Some applications have settings that can only be changed when the application is open. For instance, the program itself allows you to change the sound preferences for iTunes.
How to Check the Microphone Settings on a Mac
Microphone settings can be extremely important if you’ve denied important app permission. So, if you don’t want the problem where the other party can’t hear you during an important meeting, then it’d be worth your time to read up and find out how to check the Microphone settings on a Mac.
The majority of the time when we access apps or websites, we might get prompts that require us to give the app microphone access. If you’ve denied it by mistake then follow these steps:
Step 1 Open System Preferences by accessing the Apple Menu in the top left corner.
Step 2 Now, click on Security & Privacy and then choose the Privacy tab.
Step 3 Click Microphone from the list of options on the left side.
Step 4 Now, click the checkbox near the app of your choice. This will enable the microphone for only that specific app. And similarly, if you want to deny app permission, then uncheck it.
Of course, if the app is dependent on the microphone for its core functions then a pop-up box asking you to give it permission will pop up every time.
How to Test Your Mac’s Microphone
Testing your Mac’s microphone is extremely important these days. Especially since the majority of our work is online. Be it conferences, meetings, or even class lectures, you’ll need to check if your Mic is functioning. Finding an issue and fixing it can save you embarrassment and extra stress during online events.
The best part is that you don’t need to call somebody up for a test run nor do you have to buy expensive Third-party software to diagnose the problem. You can simply head to your Mac’s QuickTime Player to check if your mic is functioning. Just follow these steps:
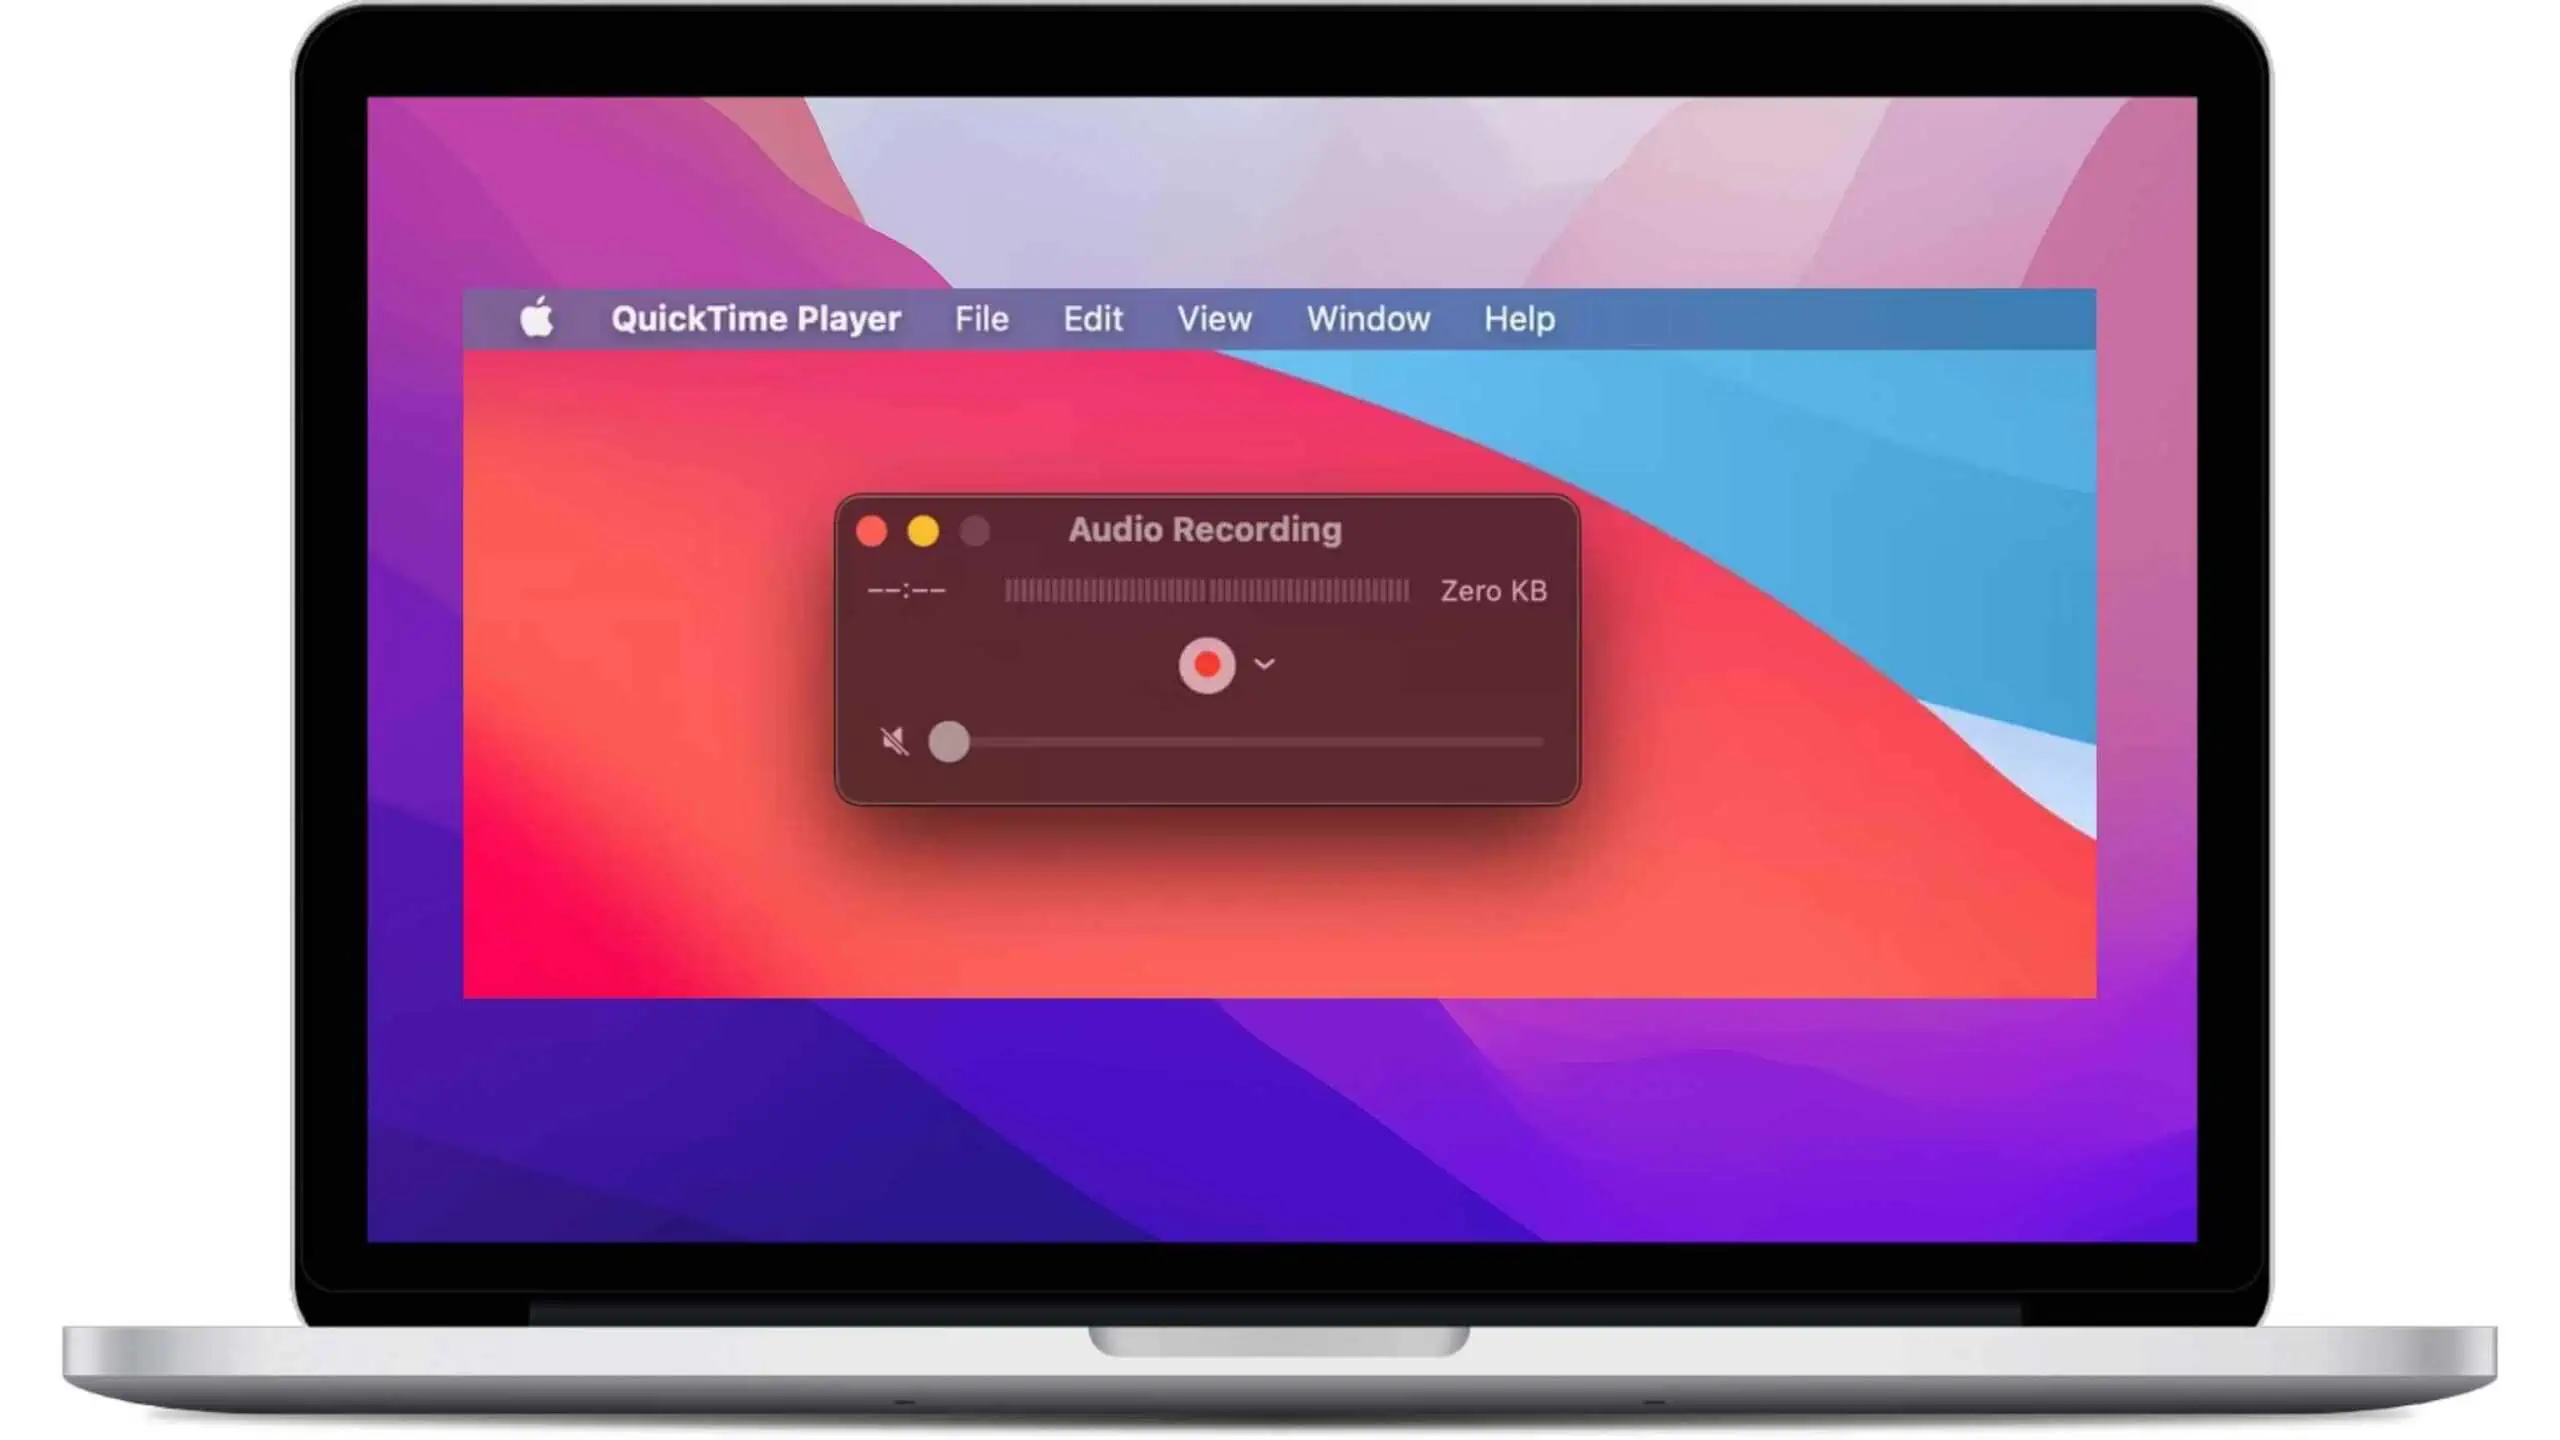
Step 1 Open the QuickTime Player from Launchpad.
Step 2 Then click on File from the menu bar.
Step 3 Now, click on New Audio Recording. When a new window appears make sure you increase the volume.
Step 4 You can now test if the microphone is recording by clicking on the red record button. Speak into the device in a loud and clear voice for about 30 seconds. 1 minute would be ideal.
Step 5 Now, you should open the recording and check if you can hear yourself clearly. There shouldn’t be any other distortions. You need to turn up the volume and ensure that it’s not an issue.
If you can hear your voice perfectly even when turning up the volume, then there are no issues with the Mic. If you can hear it then you’ll need to check if the App has Mic permissions. And if it’s still not working, then you’ll have to look for driver recovery solutions or Ideally, take it to a Genius Bar.
Note: You can see if the Recording Indicator light is active or not when your microphone is in use. You can find the Recording Indicator light in Control Center. This light is present to indicate that your microphone is in use for security and privacy. The light will also turn on when you open the Sound Input option in System Preferences.
Adjusting the Microphone in a MacBook
There are times when adjusting the Microphone in a MacBook becomes extremely important. For example, when your environment is extremely noisy, you’ll want to enable ambient noise reduction to help the microphone pick up only your voice. Most importantly, it will prevent the microphone from picking up too much background noise.
Of course, you can just the input level based on your needs. You can either increase or lower the microphone’s sound. Of course, you can not only adjust the default input level but you can even just the microphone volume for each application as well.
To access the microphone settings all you have to do is follow these steps.
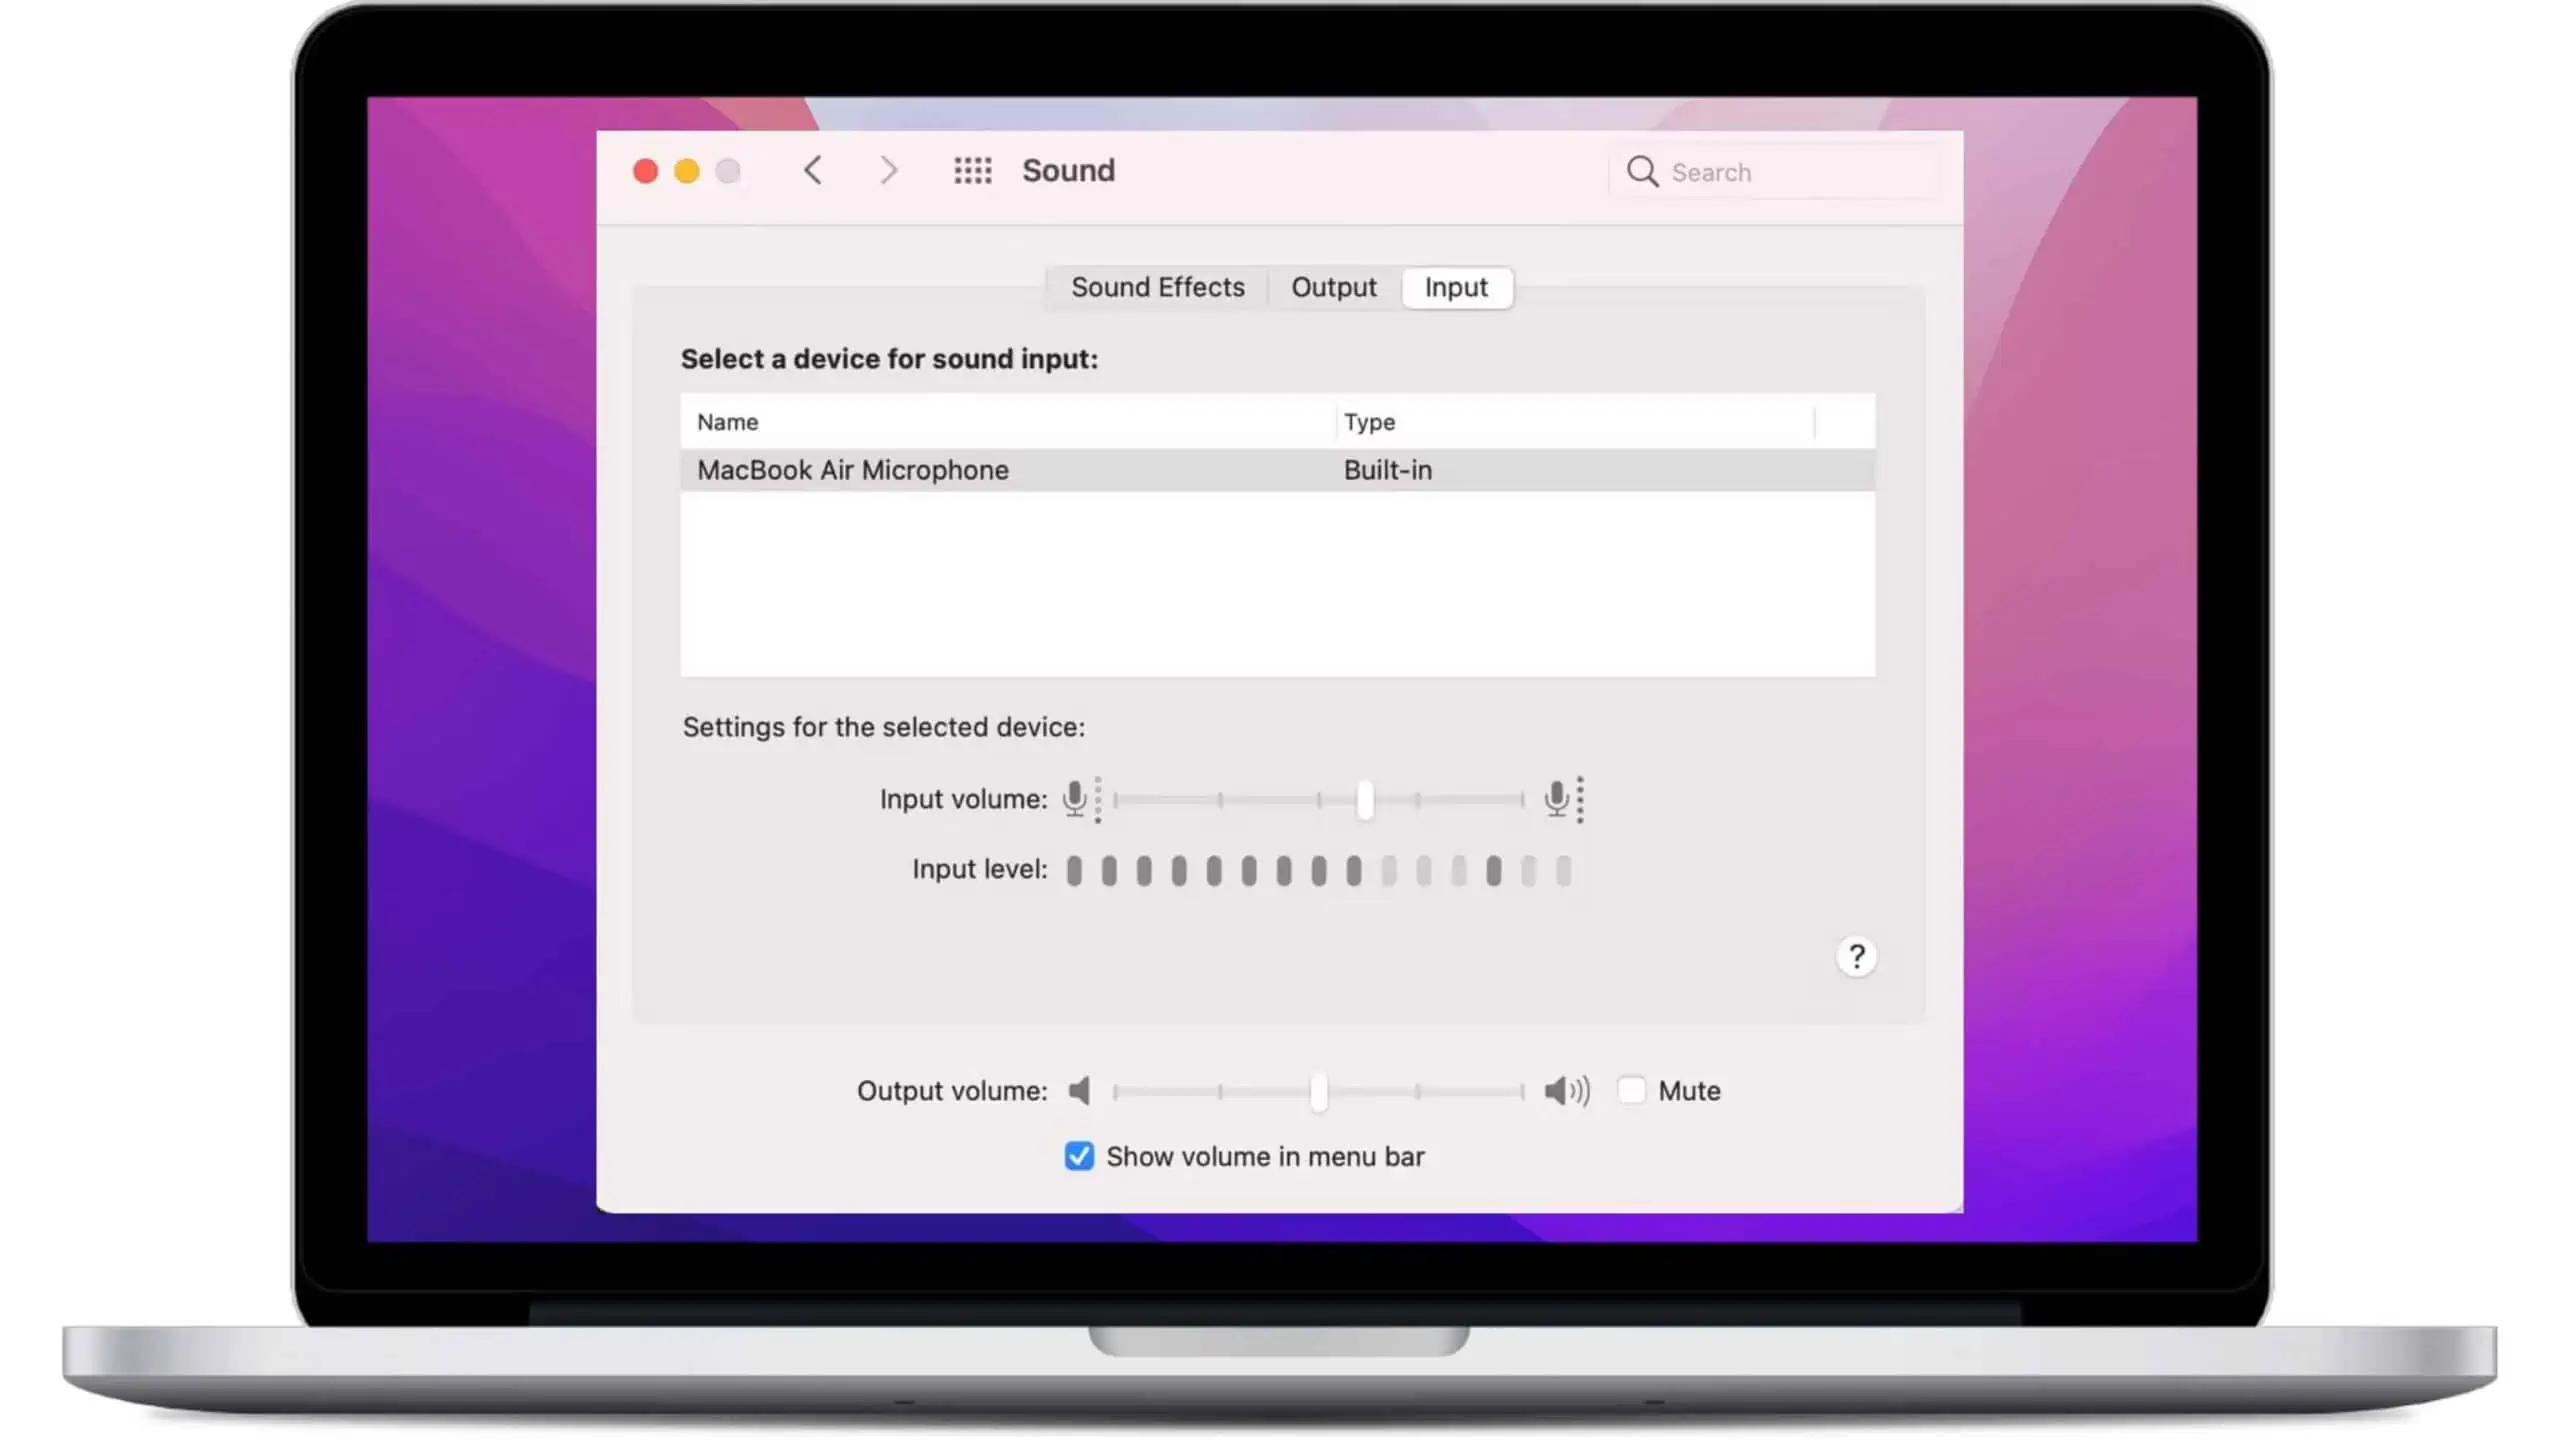
Step 1 Open System Preferences on your Mac.
Step 2 Now, tap on the Sound option in the Hardware section.
Step 3 In the sound section, click on the input tab. This will take you to the microphone settings. Here, you have access to everything microphone-related.
Step 4 If you want to adjust Mac’s internal microphone, then click on Internal Microphone in the devices list. This list also contains all the external microphones as well.
Step 5 Now, you have to slide the Input volume to the right to increase it or towards the left to decrease it. Here you can also find the Ambient Noise Reduction check box to help you reduce the background noise.
Step 6 Once done, close the settings tab and test the volume using the steps provided above. This will help you easily zero in on the volume you require.
Note: You can see if the Recording Indicator light is active or not when your microphone is in use. You can find the Recording Indicator light in Control Center. This light is present to indicate that your microphone is in use for security and privacy. The light will also turn on when you open the Sound Input option in System Preferences.
How to Allow Apps to Use Your MacBook’s Microphone
All Mac users might have had to provide access to a microphone for an app or a website. When a website or an app asks, it is easy to do so. But what if you wanted to provide or remove access without the app asking you? Check out how to allow apps to use your MacBook’s microphone in this section.
Follow these steps to provide microphone access for an app,
Step 1 Open the Apple Menu from the top-left corner of your screen.
Step 2 Now, go to System Preferences.
Step 3 Click on Security & Privacy.
Step 4 Then choose the Privacy tab.
Step 5 Now, click on Microphone.

Step 5 Enable the checkbox next to the app that you want to allow microphone access. If you want to disable access, uncheck the box.
If you don’t allow an app to use your MacBook’s microphone, then the next time you open the app, it will ask you to allow microphone access.
Takeaway
The microphone on MacBooks are almost impossible to spot yet they serve their function exceptionally well. Anything from phone calls, video calls, meetings, game streaming, and podcast recording can all be done on your MacBook, thanks to the inbuilt microphones.
I am sure by now you know where the microphone on your MacBooks are if you have had any trouble locating them before. You can direct your speech towards the microphone and improve the quality of the audio recorded.
Hope this guide on microphones of MacBook Pros and Airs helped you on locating the microphones on your MacBook and iron out any issues with it. So, Where is the Microphone on Macbook Pro & Macbook Air? Read on to find out.
Do all MacBooks have integrated microphones?
All MacBooks have microphones regardless of the model, Air, or Pro. The unibody and premium design of the Macbooks can make it challenging to find the microphone.
Check out our guide on Where is the Microphone on Macbook Pro & Macbook Air. We explain the location of the microphones of all Macbook models.
Frequently Asked Questions (FAQs)
Why is the microphone on my MacBook not working?
Microphones on MacBooks are hard to damage or break as they are inside the chassis. Only liquid damage could possibly break a microphone in your MacBook. So most of the time, if the microphone on your MacBook is not working as intended, it is probably a setting or software problem.
Low input volume has been a problem for many users, thankfully it is just a setting and you can easily change it back to normal. To adjust input volume, open System Preferences and navigate to Sound. In the Input tab, you can set the input volume depending on your need, the higher the better.
How to fix a Macbook microphone
Reset PRAM/NVRAM
If you are running an Intel-powered Mac then resetting PRAM/NVRAM can fix problems with your Mac’s microphone or anything for that matter. To reset your PRAM/NVRAM follow these steps,
Step 1 Power off your Mac.
Step 2 Note down these keys: Option, Command, P, and R. Don’t press them right now.
Step 3 Turn on your Mac, and press and hold down all four keys simultaneously.
Step 4 Hold the keys for 20 secs and release them when your Mac boots up for a second time.
Step 5 Release the keys and let your Mac boot normally. Check if your microphone works now.
How to allow mic access on Mac?
Sometimes microphone access may be turned off for certain apps and these apps won’t be able to use the microphone of your MacBook. To grant microphone access to an app, open System Preferences and navigate to Security & Privacy. Now, go to the Privacy tab and choose Microphone from the list on the left. Check the boxes of the apps that you want to allow microphone access, restart the app and the microphone of your MacBook will work on the app.
How to mute your microphone?
Muting your microphone, when not needed, is a great way to protect your privacy. You don’t want someone to hear everything from your side, be it at a meeting or while just chatting.
To mute the microphone on your MacBook, head to System Preferences. Now navigate to Sound and select the Input tab. Here, adjust Input Volume to the minimum to mute your Mic completely. Alternatively, you can use the buttons on apps like Zoom to mute your microphone.
How to turn off Microphone on Macbook
To turn off the Microphone on your MacBook, follow these steps,
Step 1 Open System Preferences on your MacBook
Step 2 Click on Sounds.
Step 3 Here, under Output, click on the Mute option.
This will mute your MacBook’s inbuilt microphone. It won’t work until you turn it on again.
Can I replace the microphone on my MacBook?
Yes, but it is not recommended to do it yourself as you can possibly damage something else as well. You can take it to a trained Apple service person or take it to an Apple Store to get your microphone replaced.
Do all MacBooks have integrated microphones?
All MacBooks have microphones, you just have to know where to find them. The unibody and premium design of the Macbooks can make it challenging to find the microphone.
Also Read:
- How to Tell if Your Mac is 32-bit or 64-bit
- How to Fix Low or No Audio when Recording Videos on iPhone
- Which Apple laptop should I buy?
Alan Urban is the Editor-in-chief of Stupid Apple Rumours and often proclaims that he’s ” Apple’s number one fan.”
In addition to keeping up with the latest Apple news, he also reviews Apple products and creates user-friendly guides. When not subjecting Apple Devices to crazy stress tests, he’s usually playing games on Apple Arcade

