Sending photos or attachments via email is a common task for iPhone users, allowing them to easily share files with friends, family, or colleagues.
In this article, we will explore five different methods to attach files to emails on an iPhone. Whether you want to send a memorable photo, an important document, or a fun video clip, these methods will guide you through the process, making it simple and efficient.
Discover how to utilize the built-in Mail app to compose and send emails with attachments effortlessly, enhancing your communication and file-sharing capabilities on your iPhone.
To send photos or attachments on iPhone, do this,
Open the mail app, tap on Compose, and enter the sender’s information, subject, and body.
Attach photos, videos, or documents by selecting the attachment icon and choosing the desired file.
Preview the selected media, and when ready, simply tap Send to send your email.
This is just one of the ways you can send a photo or attachment on your iPhone using mail. read our full guide on how to send photos or attachments on iPhone for all the methods.
How to Send Photos or Attachments on iPhone
Table of Contents
How to Attach a Photo or Video to an Email
Documents/files are more popularly shared using emails compared to photos or videos, but you can still share them.
I share a lot of images over email for work purposes, so if you are someone wondering how to send photos or videos or email on iPhone, then follow the below steps,
- Open the Mail app on your iPhone.
- Look for the Mail app icon, usually a white envelope with a blue background, on your home screen and tap on it to open the app.
- Tap on the Compose button.
- In the bottom right corner of the screen, you’ll find a button with a square and a pencil icon. Tap on this button to start composing a new email.
- Enter the necessary information.
- Type in the sender’s email address, subject line, and the body of the email as needed. This is where you can include any additional text or explanation for the recipient.
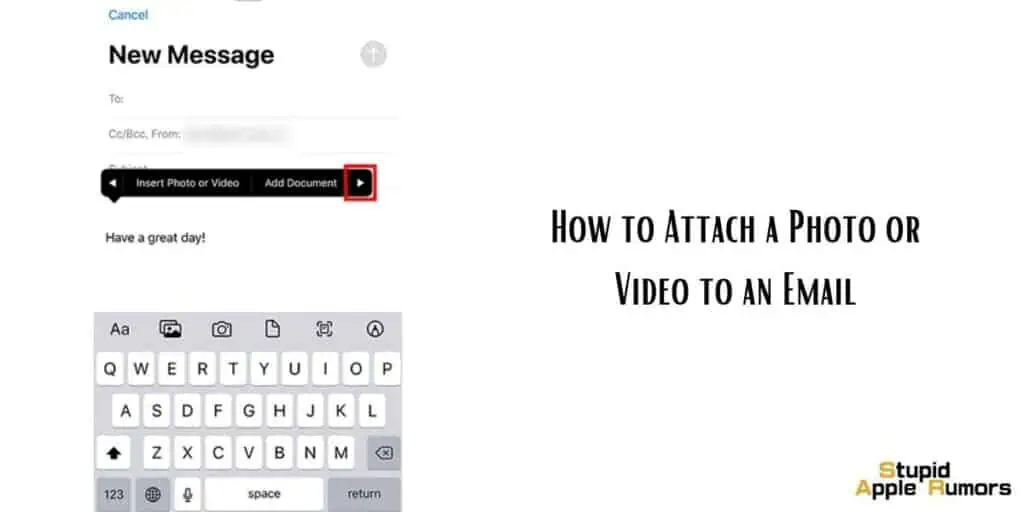
- Decide where to attach the photo or video.
- Tap on the location within the email where you want to attach the photo or video. This can be anywhere in the body of the email. As you tap, a menu bar will appear. Alternatively, you can tap the left-facing arrowhead icon (←) in the format bar above the keyboard to open the menu bar.
- Access the attachment options.
- Once the menu bar appears, look for the icon that represents a photo (usually a mountain inside a frame) and tap on it. This will open the attachment options for adding media to your email.
- Select the photo or video you want to attach.
- Browse through your photo or video library to choose the file you wish to send. You’ll see a preview of the selected media, and if you’re satisfied, tap on the preview to attach it to the email.
- Send the email.
- After attaching the desired photo or video, look for the Send button located in the upper right corner of the screen. Tap on this button to send the email with the attached media.
How to Take a Photo or Video to Insert into an Email
Learn how to quickly and effortlessly share captivating photos or videos via email on your iPhone using the Mail app.
Whether it’s a spontaneous moment or an important visual update, follow these straightforward steps to ensure seamless transmission:
- Step 1: Launch the Mail app
- Locate and tap the Mail app icon on your iPhone’s home screen to open it.
- Step 2: Compose a new email
- Within the Mail app, locate and tap the Compose button conveniently positioned in the bottom right corner of your screen.
- Step 3: Provide email details
- Enter the necessary information, including the sender’s information, a concise yet descriptive subject line, and any relevant context in the email body.
- Step 4: Choose placement for the photo or video
- In the body of your email, select the specific location where you want to embed the dynamic photo or video.
- Alternatively, tap the left-facing arrowhead icon (←) in the format bar above the keyboard to access additional options.
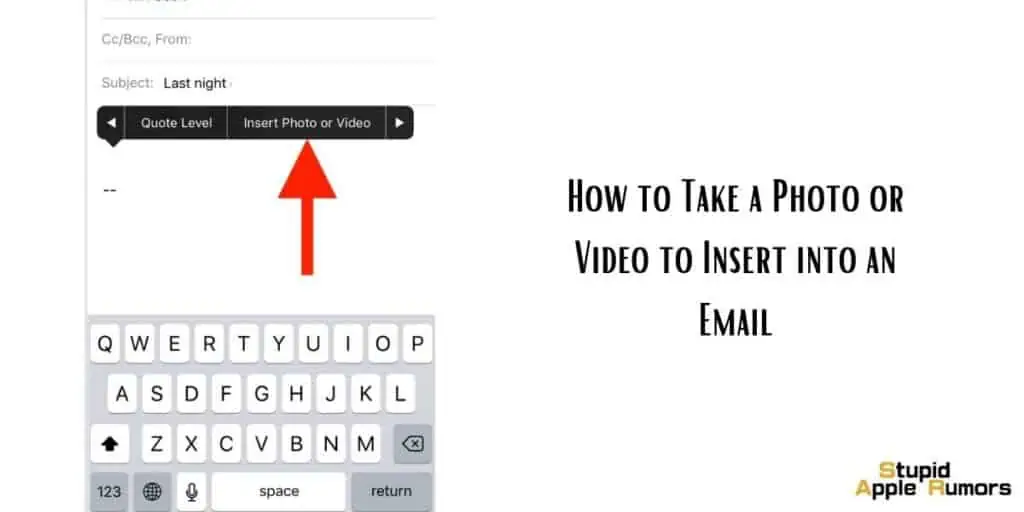
- Step 5: Access the camera functionality
- To enable the camera functionality, tap the camera icon (📷) displayed in the menu bar that appears.
- Step 6: Capture the perfect shot or video
- Utilize your iPhone’s camera to take a high-quality photo or record a captivating video. If necessary, you have the option to retake the shot or video to ensure it meets your desired standards.
- Step 7: Send the email with your visual content
- Once satisfied with the captured photo or video, tap the Send button positioned in the upper right corner of your screen. This action transmits your email along with the seamlessly embedded photo and/or video attachment.
How to Send Multiple Pictures from my iPhone as an Attachment?
- Open the Photos app on your iPhone.
- Locate the Photos app on your home screen, which has a colorful pinwheel icon, and tap on it to open the app.
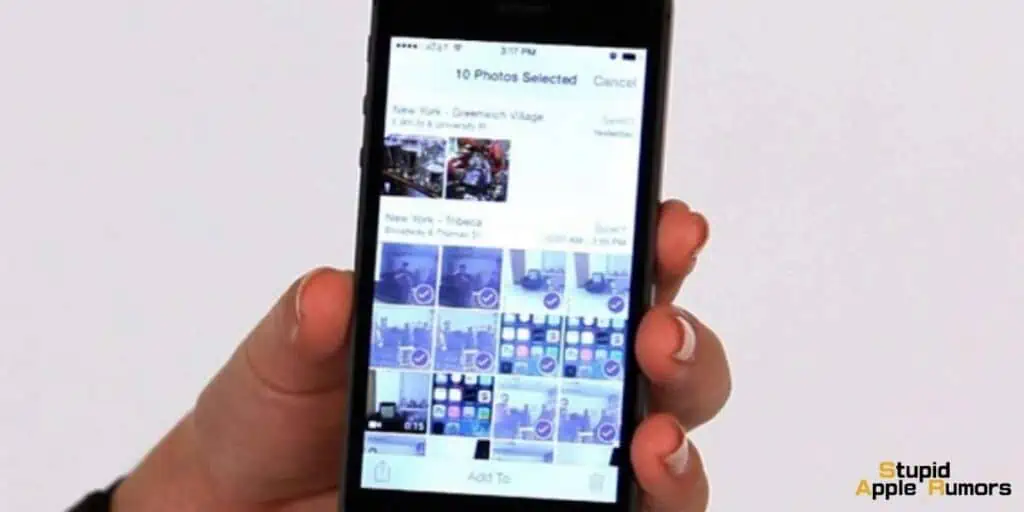
- Select the pictures you want to send.
- Within the Photos app, find and long-press on the first picture you wish to send. As you do this, you’ll see a checkmark appearing on the selected photo. Continue selecting additional pictures by tapping on them or swiping your finger across the screen.
- Tap on the Share button.
- Once you’ve selected all the desired pictures, look for the Share button located at the bottom left corner of the screen. It’s represented by a square with an upward arrow. Tap on this button to proceed.
- Choose the Mail app icon.
- In the Share menu that appears, scroll through the available options and locate the Mail app icon, which resembles a white envelope. Tap on it to select the Mail app for sending the pictures.
- Enter email details.
- Upon selecting the Mail app, you’ll be directed to a new email window. Fill in the necessary information, including the sender’s email address, subject line, and any additional message you want to include in the email body.
- Send the email.
- Once you’ve entered all the required information, review the email to ensure everything is correct. Finally, tap on the Send button to send the email with the attached pictures.
How to Attach a Document to an Email
- Open the Mail app on your iPhone.
- Locate the Mail app on your home screen, which is usually represented by a white envelope icon, and tap on it to open the app.
- Tap on the Compose button.
- In the bottom right corner of the screen, you’ll find a button with a square and a pencil icon. Tap on this button to start composing a new email.
- Enter the necessary information.
- Within the new email window, enter the sender’s email address, a brief and clear subject line, and any additional text or information you want to include in the email body.
- Choose the location for the document attachment.
- In the body of the email, tap on the specific location where you want to attach the document. Alternatively, you can tap the left-facing arrowhead icon (←) in the format bar above the keyboard to access additional options.
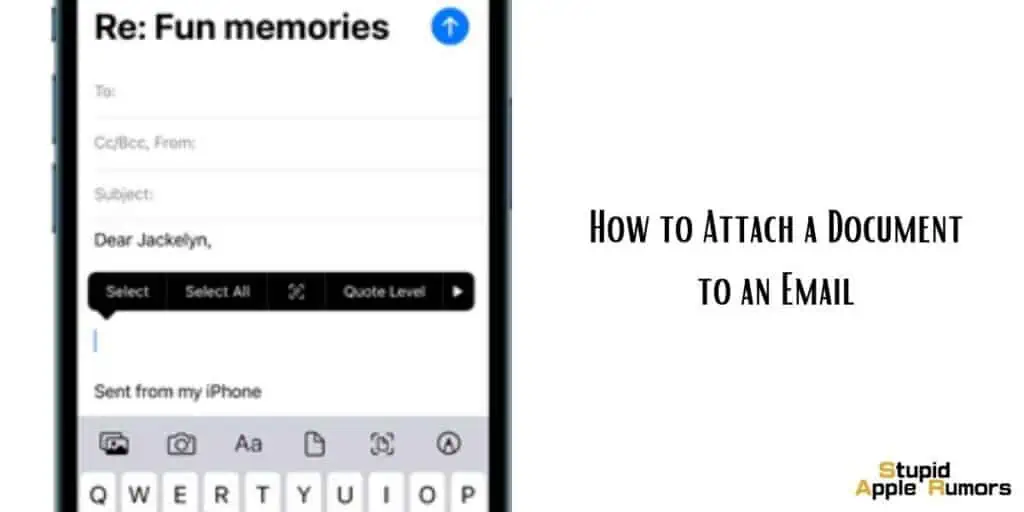
- Access the attachment options.
- Once you’ve selected the attachment location, a menu bar will appear. In the menu bar, locate and tap on the icon that represents attachments or documents. This icon is typically shown as a paper clip or a file folder.
- Select the document you want to attach.
- Browse through your iPhone’s files and select the document or file you wish to attach to the email. You’ll see a preview of the chosen document. If you’re satisfied with it, tap on the preview to attach it to the email.
- Send the email with the attached document.
- After attaching the desired document, review the email to ensure everything is in order. Finally, tap on the Send button located in the upper right corner of the screen to send the email with the attached document.
How to Scan and Attach a Document to an Email
The Mail app on iPhone allows you to scan and attach a document if needed. This can be useful if you don’t have the document already saved on your iPhone. To scan and attach a document to an email, follow these steps,
- Open the Mail app on your iPhone.
- Locate the Mail app icon on your home screen, which resembles a white envelope, and tap on it to launch the app.
- Tap on the Compose button.
- In the bottom right corner of the screen, you’ll see a square icon with a pencil. Tap on this button to create a new email.
- Enter the necessary information.
- Within the new email screen, provide the sender’s email address, a clear subject line, and any additional details you wish to include in the email body.
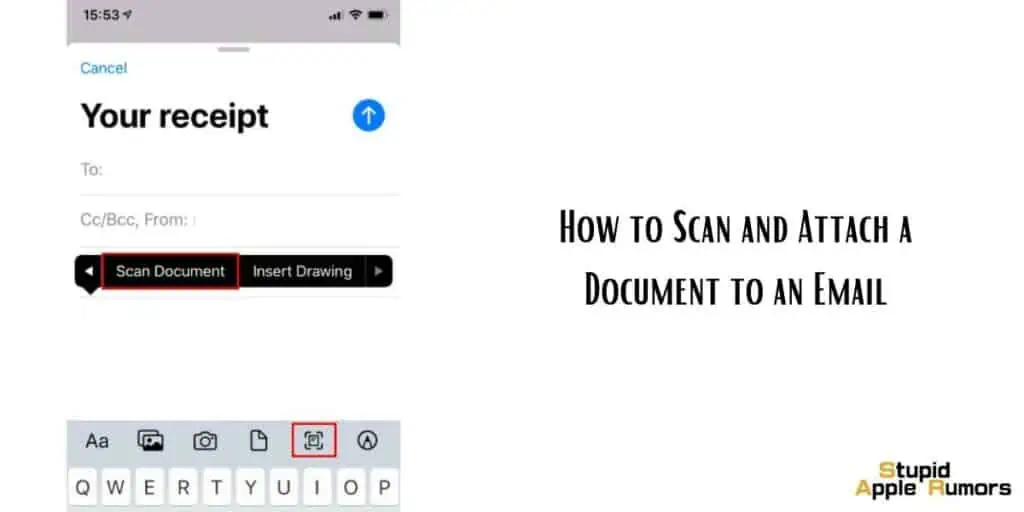
- Choose the location for the document attachment.
- Tap on the area within the email where you want to attach the document. Alternatively, you can tap the left-facing arrowhead icon (←) in the format bar above the keyboard to access more options.
- Access the scanning feature.
- Once you’ve selected the attachment location, a menu bar will appear. Locate and tap on the Scan Document icon, which looks like a document with a magnifying glass or a “+” symbol.
- Position your iPhone for scanning.
- Hold your iPhone so that the entire document you want to scan is visible on the screen. Your iPhone’s camera will automatically capture the page. However, if you only want to scan a specific portion of the page, you can manually capture it by tapping the capture button or use the flash by tapping the flash icon.
- Scan multiple pages if necessary.
- If you have multiple pages to scan, continue positioning and capturing each page. Once you’ve finished scanning, tap the Save button.
- Edit the scanned document (optional).
- If needed, you can make changes to the scanned document. Tap on the document to access editing options such as cropping the image, applying filters, rotating the image, or deleting the scan. To perform any of these actions, simply tap on the respective icons.
- Send the email with the attached document.
- After scanning and editing, review the email to ensure all the necessary information is included. Finally, tap on the Send button located in the upper right corner of the screen to send the email with the scanned document attachment.
How to send a Drawing in your Email on iPhone
If you want to draw and attach the file to an email, then follow these steps,
- Open the Mail app on your iPhone.
- Locate the Mail app icon on your home screen, which resembles a white envelope, and tap on it to open the app.
- Tap on the Compose button.
- In the bottom right corner of the screen, you’ll see a square icon with a pencil. Tap on this button to start composing a new email.
- Enter the necessary information.
- Within the new email window, enter the sender’s email address, a clear subject line, and any additional information you want to include in the email body.
- Choose the location for the drawing attachment.
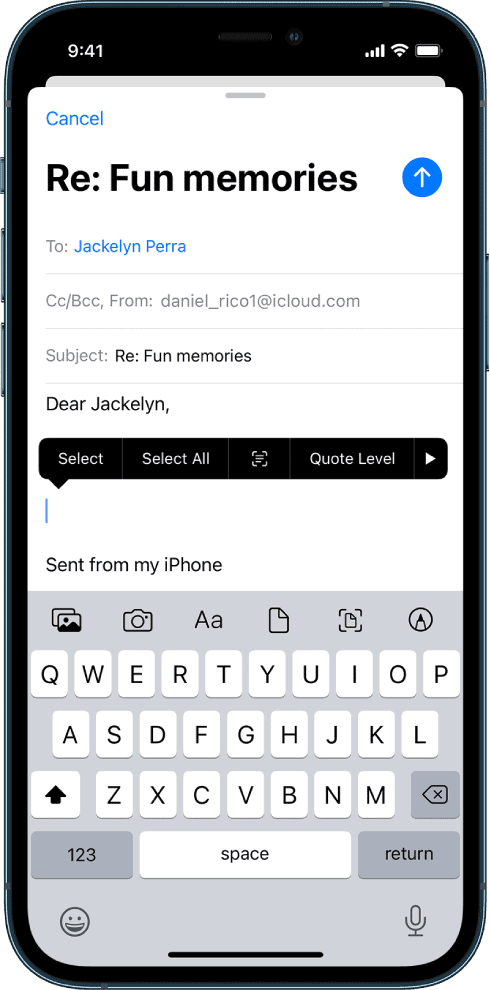
- Tap on the area within the body of the email where you want to attach the drawing. Alternatively, you can tap the left-facing arrowhead icon (←) in the format bar above the keyboard to access more options.
- Access the drawing feature.
- Once you’ve selected the attachment location, a menu bar will appear. Look for and tap on the draw icon, which resembles a pen or pencil, to access the drawing tools.
- Create your drawing.
- Use your finger or stylus to draw anything you like using the available drawing tools. You can choose different colors, pen sizes, and even add text if desired. Once you’ve finished drawing, tap Done.
- Insert the drawing into the email.
- After tapping Done, you’ll see an option to insert the drawing into the email. Tap on Insert Drawing to attach your artwork.
- Send the email with the drawing.
- Review the email to ensure everything looks good, including the drawing you’ve attached. Finally, tap on the Send button located in the upper right corner of the screen to send the email with the drawing.
What to Do if I’m Unable to Send Photos or Attachments on an iPhone?
If you’re having trouble sending photos or attachments on your iPhone, there are several troubleshooting tips you can try to resolve the issue.
Please follow these steps:
Check your internet connection: Ensure that you have a stable internet connection, either through Wi-Fi or cellular data. Weak or intermittent connectivity can cause issues with sending files.
Update your software: Make sure your iPhone is running the latest version of iOS. Software updates often include bug fixes and improvements that can address issues like sending photos or attachments.
Restart your iPhone: Restarting your device can help resolve temporary glitches or conflicts. Press and hold the power button until you see the slider, then swipe it to turn off your iPhone. Wait a few seconds, then press and hold the power button again until the Apple logo appears.
Check your Mail app settings: If you’re using a specific Mail app, such as Mail or Gmail, ensure that the app has the necessary permissions to access your photos and attachments. Go to the Settings app, find the app in question, and review its permissions and settings.
Clear the Mail app cache: If you’re using an email app, clearing its cache can sometimes resolve issues. Open the Settings app, find the app in question, and look for an option to clear the cache.
Check your network settings: If the issue persists, verify that your iPhone’s network settings are correctly configured. Go to the Settings app, tap “Wi-Fi” or “Cellular,” depending on your connection type, and ensure that you are connected to the appropriate network.
Disable Low Power Mode: If your iPhone is in Low Power Mode, some features and functions may be restricted. Disable Low Power Mode by going to the Settings app and tapping “Battery.” Ensure that the Low Power Mode toggle is turned off.
Reset network settings: Resetting network settings can often resolve connectivity-related issues. However, note that this action will remove your saved Wi-Fi passwords and other network-related settings. To reset network settings, go to the Settings app, tap “General,” then “Reset,” and select “Reset Network Settings.”
Contact Apple Support: If none of the above steps resolve the issue, consider reaching out to Apple Support for further assistance. They can provide personalized guidance based on your specific iPhone model and software version.
How to Send Photos or Attachments on iPhone – Takeaway
So, there you have it, you now know how to send photos or attachments on your iPhone. You also know how to take images or videos, scan documents and draw in email. These are simple and easy to do.
So next time you have only your iPhone, don’t worry about not being able to send photos or attachments through email. Below you find answers to some FAQs related to how to send photos or attachments on iPhone.
How to Send Photos or Attachments on iPhone – FAQs
How do I send multiple pictures from my iPhone as Text?
Step 1 Open the Photos app on your iPhone.
Step 2 Long press and select the pictures you want to send.
Step 3 Tap on the Share button at the bottom left corner.
Step 4 Select the Message app icon.
Step 5 Now enter the phone number.
Step 6 Tap on Send.
Check out our guide on How to Send Photos or Attachments on iPhone for more details.
What is the best way to send photos from an iPhone?
The best way to send photos from your iPhone would be to use the iCloud feature.
For this, you will need to enable iCloud Photos in the Settings of your iPhone.
Once it is enabled, you can share using iCloud from the Photos app on your iPhone. This is fast and easy as you can share iCloud links of the photos in an instant.
Read our How to Send Photos or Attachments on iPhone for more details.
Why does my iPhone not send pictures as attachments?
Apple has changed how images work with the Mail app since iOS 14.2.
Instead of images being sent as attachments, they are embedded in the body of the email.
If you send multiple images, then the recipient can download all the pictures at once in the form of a .zip file.
While Apple did not provide any reason for the change, it embraces form over function.
This new method of embedding images looks better but can cause inconveniences, especially in workplaces where ‘Plain Text Only’ emails are still a thing.
If you don’t like this feature/change, there is not much you can do but change email apps for your iPhone.
Also Read:

