Want to hide some private files and folders on your Mac? Find out How to Hide Files on Mac.
Have you ever caught people snooping on your Mac? I have been mad at people for looking at some of my personal files on my Mac. I can’t entirely blame them as it is human nature to be curious.
I store a lot of personal information and files on my MacBook Air as it is safe and always with me. But when it goes into the hands of others, I start sweating bullets, that someone might see them or accidentally mess with them.
A solution for this is to hide your personal or important files and folders. You can hide files/folders in plain sight or behind secure virtual vaults and secondary accounts.
Besides, hiding files is a nice way of making sure that your privacy is not compromised. All your important detail and personal files will be safe from the prying eyes of others. This article will let you know how to hide files and folders on your Mac. Here’s How to Hide Files on Mac.
Related: How to Select Multiple Photos on your Mac
After having gone through various official documents from Apple and subjecting Mac desktops to various tests; my team and I found that:
Although there are various methods to hide your files on your Mac desktop, the easiest method would be to turn the visibility attribute invisible. To do this all you have to do is user must open the Terminal, type setfile -a V without pressing enter, Next, drag the file or folder into the Terminal window. Press Enter to execute the command and hide the file.
How to Hide Files on Mac
Table of Contents
Why files and folders might be hidden?
All operating systems have many files and folders hidden by default. These files and folders are system files that should not be disturbed as they are essential for the OS to run. This is the case with macOS too, developers don’t want anyone to mess with important systems files and hide them away.
How to Hide Files on Mac
There are a few methods that you can use so choose the one that is most comfortable and convenient for you. You can hide files and folders on your Apple device using:
Using Mac Terminal
You can hide files in plain sight using this method without the need for passwords and usernames. You will have to use the terminal but it is a straightforward and easy method.
- Click on Finder.
- Now select Applications on the left panel.
- Navigate to the Utilities section and double-click to enter the Utilities Menu.

- Alternatively, you can open a Terminal by pressing on Command+Space and typing Terminal in the search bar, and pressing enter/return key. Find out How to Hide Files on Mac.
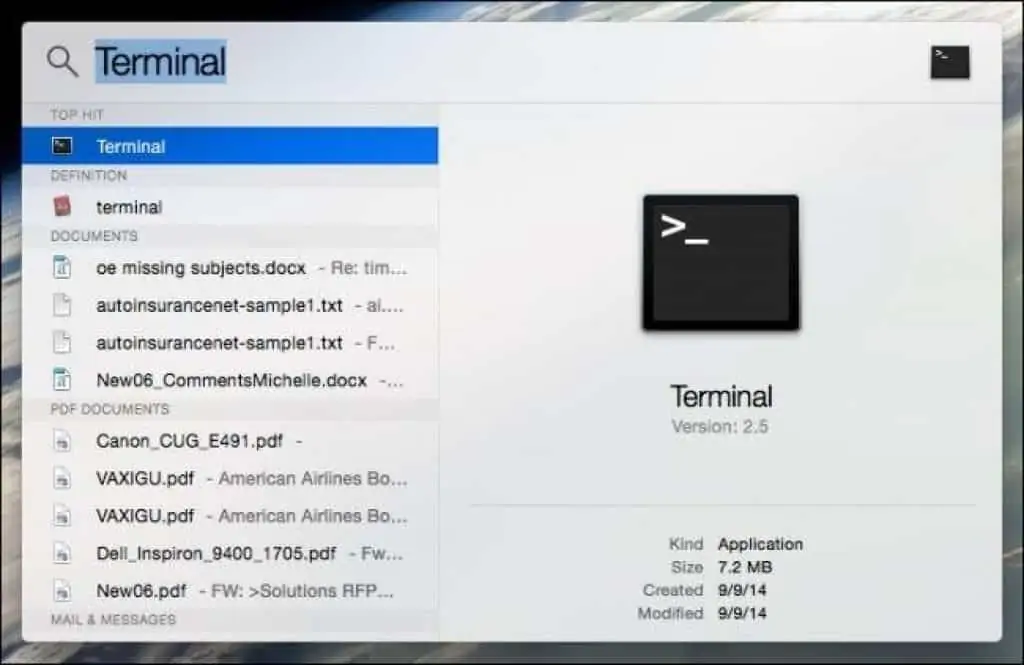
- Type “chflags hidden” without quotes.
- Drag and drop any file or folder onto the Terminal Window.
- Press Enter/Return key and the file or folder will vanish.
- You will have to remember the file path so that you can access it again.
This is one of the easiest and straightforward ways to hide files and folders as they are only invisible to the naked eye. To access hidden files and folders, I have written a section on it below.
Check out the latest MacBook Air on Amazon!
Using Keyboard Shortcuts
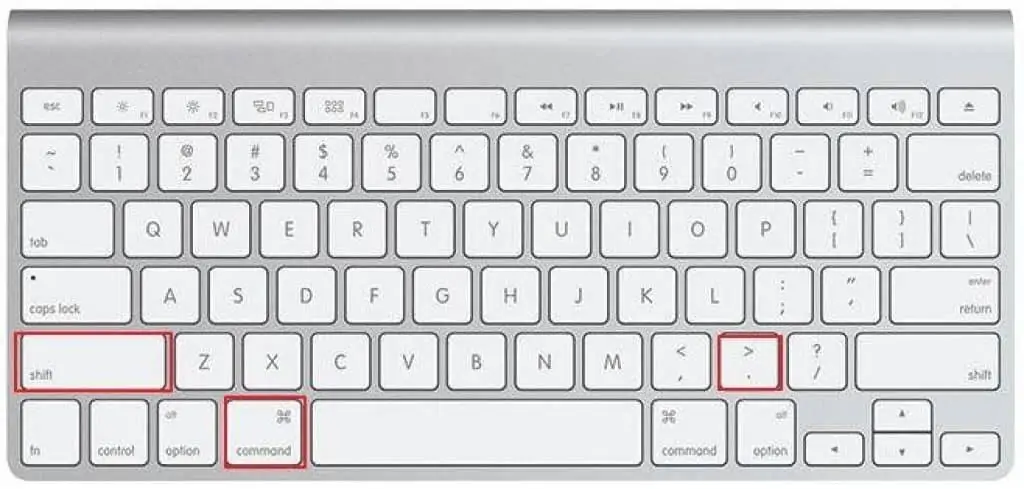
These are quick and nifty little keyboard shortcuts and commands that you can use to hide files. Find out How to Hide Files on Mac.
- You can hide or unhide files using this option. Depending on if the files are hidden or not it will switch between the two.
- So, if a file is hidden, it will unhide and vice versa. Press Shift+Command+. to switch between the hide/unhide status of the file or folder.
Check out the latest MacBook Air on Amazon!
Using Library Folder
Using the Library Folder is a great way to hide your files too. The Library Folder is hidden by default so this makes it a great place to store your important/secretive files and folders. All you need to do is:
- Open up the Finder
- Now hold the Option key to open the Finder’s Go menu
- Navigate to the Library folder
- You can create a new folder in there or drag and drop files and folders that you want to hide.
Using Apple’s Developer Tools
This is one of the easier methods to hide your files but you will need to have Apple’s Developer Tools installed for this.
- If you have it installed, just fire up a Terminal and type “setfile -a V” followed by the name of the file/folder without the quotes.
- This makes the file/folder invisible; you can undo this by repeating the process, but you will have to use a lower-case v in the command.
Check out the latest MacBook Air on Amazon!
Using FileVault
This is the easiest way to hide files on your Mac as you don’t have to code and stuff, unlike some other methods. You can FileVault, it is a feature in Mac that can help your hard drive to be accessed only using your password and admin. Follow these steps to use FileVault and hide files on your Mac:
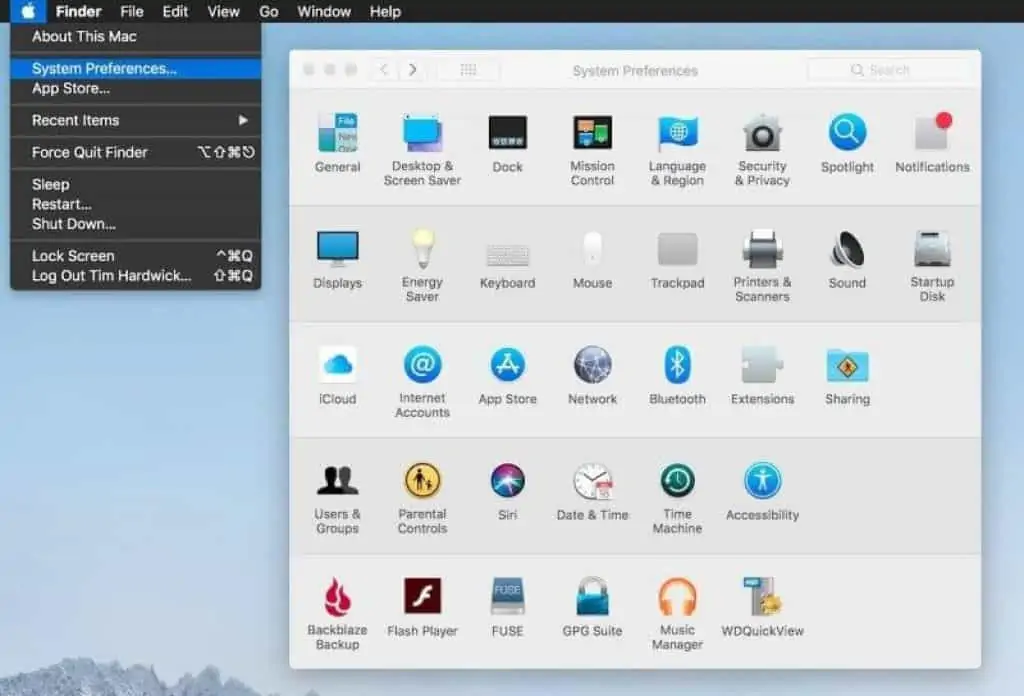
- Click on the Apple icon that is located at the top left corner of your screen.
- Click on the System Preferences option.
- Choose Security & Privacy by clicking on it.
- Navigate to the FileVault tab, it is next to the general tab.
- Click on the padlock icon.
- Now click on the Turn On FileVault button.
- You will have to choose a recovery method now. There are two options that you can use, iCloud or generating a local recovery key. Write down the recovery key, in case you forget it.
- Now click on Continue.
- Click the continue button again and voila, the process is complete.
Your hard drive and files are secure by FileVault and others can only access them with your username and password.
It will take time depending on the number of files and specs that are getting encrypted and you need to make sure to keep your Mac connected to a power source for a smooth encryption process.
In the meanwhile, you can surf, watch something, or play games on your Mac. When the encryption is done, only you will be able to access your files and folder using your username/password.
Check out the latest MacBook Air on Amazon!
Using another account
Macs allow you to create multiple user accounts. And you can’t access files and folders of an account from a different account. You can use this feature to your advantage and store your personal files on a different account. To create a second account:
- Open Apple Menu.
- Navigate to System Preferences.
- Now click on the Users & Groups option.
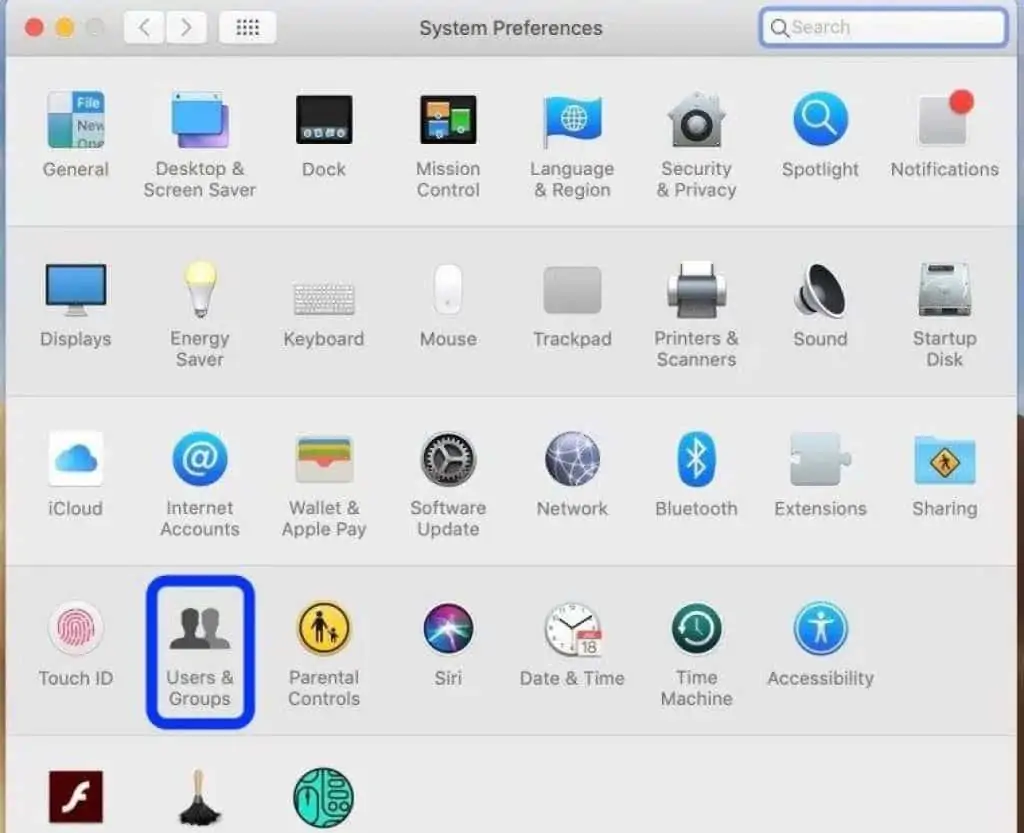
- Click on the Lock button and then click on the + button.
- Enter details for the new account to set up a Profile.
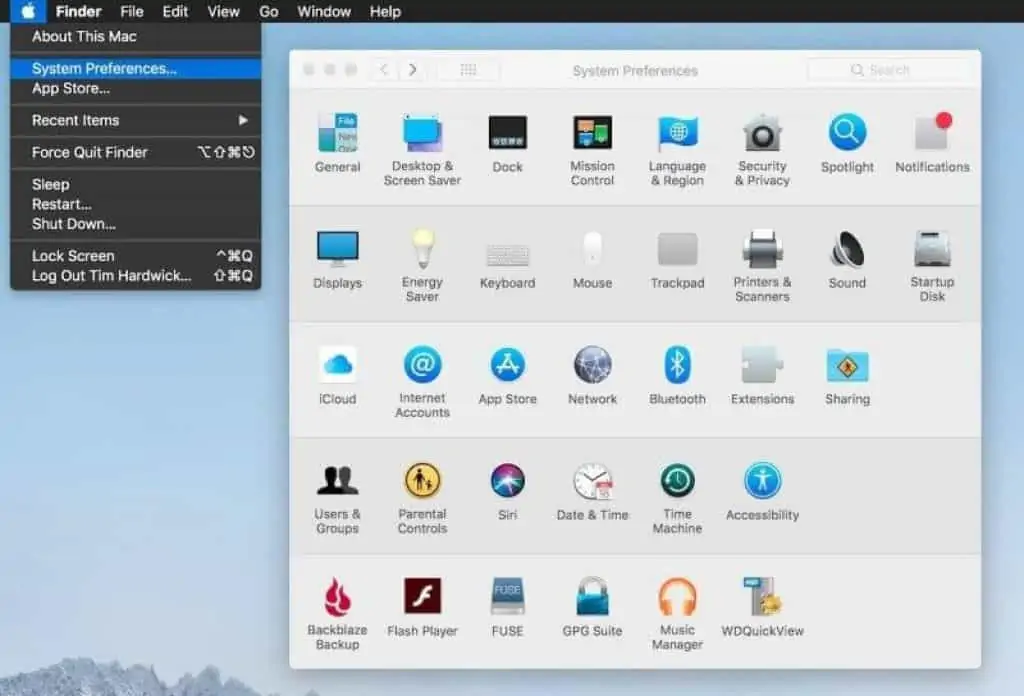
Your Mac will now have a second account that you can use to hide files and folders from your main account. To make sure that the files and folders are not accessible between the two accounts, you will have to turn off file sharing. You can do that in the Apple Menu> System Preferences> Sharing.
Using Third Party Apps
Third-Party apps can help you hide files from other users of your Mac. Some of the better ones are Altomac’s Hide Folders, Apimac’s Secret Folder, and AES Crypt.
How to hide files and folders on Mac with Funter?
Funter is a free to use application that’s available on their official webpage and it’s super easy to use. The app can run on Mac’s that use macOS or later and all it takes is a singly click to hide a file or view a hidden file.
One thing that’s great about the Funter app is that it integrates with Apple’s Finder so there is a small Funter icon that’s present in the Finder tool bar.
In order to hide files and folders with Funter simply right click on the file or folder to open the options menu. Now click on hide with Funter to hide the file. To view the hidden file simply click on the Funter icon from the tool bar and then tap on Show Hidden Files.
How to hide files and folders on Mac with Altomac
Altomac is another flawless tool that hides files and folders on a Mac with a few easy clicks. It’s completely free to download and use so you don’t have to worry about paying a premium.
However, there are some bonus features that are available only to those who opt to buy the Pro version of the software. With Altomac hiding and revealing hidden files is super easy and one thing that makes this software stand out is that it comes with a password protection feature to protect your hidden files.
Using the “mv” command
For those who love to fiddle with their computer, this would be a much more interesting way to hide files. By using the “mv” command, you can move the file from one place to a different folder. While you can use this command to easily hide it in a folder that’s inside multiple folders, the most useful aspect of this command is to move the file to a period folder.
Period folders are relatively well-hidden folders that contain critical system information. So, you won’t be able to access them through the regular UI.
Here are the steps to turn your files invisible with this method:
- Go to the Terminal and type in mv filename .filename.
- Now change the name of the first filename bit to the name of the file you want to hide.
- And then change the name of the .filename to the system file
- This will ensure that your file is hidden
How to Hide Files on Mac by Adding a dot before the file name

If you have noticed, you would see a dot (.) before the names of a hidden file. So, you can also rename any file with a dot (.) in front to hide it. Follow these steps,
Step 1 Right on the file you want to hide.
Step 2 Select Rename and then add a dot in front of the file name.
Step 3 Now, confirm that you want to make the file invisible.
Step 4 The file will gray out and then disappear.
How to hide files on Mac using Parallels Toolbox
Parallels Toolbox as the same suggest is a toolbox for your Mac with many tools for system management. One of the tools in Parallels Toolbox is the ability to hide files and folders on your Mac. You can access this tool by going to the Hide Desktop icon in the app. This is one of the easiest ways to hide files on Mac.
How to Hide Files on Mac – Takeaway
Hiding files and folders is nothing more than a privacy measure. Hiding files or folders will keep them safe when someone else is using your Mac.
If you need to make sure your personal or important files are safe, hiding them is one of the best ways to keep them safe.
This article was to inform you on how to hide files and I hope it was of help. It will offer you peace of mind when someone else uses your Mac.
Check out the latest MacBook Air on Amazon!
How do I hide files on my Mac desktop?
The easiest method to hide your files on your Mac desktop would be to turn the visibility attribute invisible. To do this all you have to do is:
- Open the Terminal.
- Type setfile -a V without pressing enter
- Next, drag the file or folder into the Terminal window.
- Press Enter to execute the command and hide the file.
How to access hidden files on a Mac?
Now, that you know how to hide files on your Mac we’ll also teach you how to access them. The following methods will be useful if you’ve forgotten where you hid the files or if you forgot the attributes/names of the files/folder.
Of course, these methods are also useful if you need to find a system file to troubleshoot an issue or if you’ve given your MacBook to somebody you don’t trust. Here are the three ways to access hidden files on Mac.
Access hidden files on Mac via Finder
Finding the hidden file isn’t difficult unless you’ve encrypted it with a third-party tool. All you need to do is:
- Access Finder and open up the Macintosh HD folder.
- Now, press Command+Shift+Dot at the same time, and all of the hidden files will become visible. If you click on the three buttons again, then they’ll disappear. This is the best solution for files hidden with an invisibility attribute.
- This function is applicable to all documents or application folders.
However, if you want to find files in the ~/Library folder. Then you should follow these steps:
- Access Finder and press Alt and click on the Go which can be found at the top of the screen. Now, click on Library to open the hidden folder.
Of course, the only irritating aspect of both these methods is that all the files will appear on the desktop, including system files and autosaved documents. So, you’ll spend a considerable amount of time sifting through them to find your file.
Unhide files on Mac with Terminal commands
You can also use the Terminal and use command prompts to help save a lot of time and steps if you want to access hidden files. You can run the following command script to find hidden files:
- Open Terminal and enter: defaults write com.apple.Finder AppleShowAllFiles true [Press Return] killall Finder
- Now, you can access the hidden files.
- If you want to hide them again. Change true to false in the command.
We recommend using Finder to find hidden files if you are new to running commands on Terminal.
View hidden files on Mac using file managers
Apart from the other two methods, you can also access your hidden files on Macbook using file managers like Dropover, ForkLift, etc. Moreover, if you’re not comfortable using Terminal or Finder, these applications can help you significantly.
With the help of view keyboard shortcuts, you can hide or unhide your files through these apps and make the whole process much more manageable. If you’re looking forward to choosing Forklift to view your hidden files, make sure to follow these steps carefully:
- Firstly, click on the ‘View’ option.
- Secondly, select the Viewing Options from the bottom of the dropdown menu.
- Lastly, you’ll see an option to Show hidden files. Make sure to select the box next to it, and you’ll be able to see your Macbook’s hidden files.
How to allow Mac to clean up the hidden files automatically?
Unfortunately, there are no features in Macbooks that can clean up your hidden files. However, with the help of a few third-party applications, you can delete some hidden and unwanted junk files. For instance, apps like CleanMyMac X can easily access these hidden files and remove them from your system to free up some space on your hard drive.
To do so, make sure to read these steps carefully and follow them in the correct order:
- Download the CleanMyMac X application from its official site and install it on your Macbook.
- Now, launch the app on your Mac and choose “Smart Scan” from the top left of the sidebar.
- Once the scan is completed, select the System Junk category from the Cleanup option.
- Lastly, click on the ‘Clean’ button to remove all hidden or unwanted junk from your Macbook.
How to unhide a file on Mac?
As I mentioned earlier, there are three ways to hide files on your Macbook, i.e. by using Finder, Terminal, or File Managers. Similarly, you can unhide any file on your system by using the same methods. For instance, if you’re comfortable with using Finder on your Macbook, then open up the Macintosh HD folder again. Now, press Command+Shift+Dot and this will make all your hidden files visible.
If you prefer using Terminal rather than Finder, then all you have to do is follow a remote command. To access or unhide a file while using Terminal, we’ve to follow this command:
defaults write com.apple.Finder AppleShowAllFiles true [Press Return]
killall Finder
Now, this command will make your hidden files visible, and you’ll be able to access them by simply clicking over them. Similarly, if you want to hide these files again, change “true” to “false” in the command mentioned above, and that’ll hide all those files again.
Lastly, while using file managers like Forklift, all you have to do is first click on the View option. Then, choose View Options from the dropdown menu and select the Show hidden files box. If you want to keep these files hidden, then make sure to unselect the same box.
How To Hide Files on Mac: FAQs
Can I hide folders in Finder on Mac?
Unfortunately, there’s no option of hiding a folder through the Finder only. However, if you’re comfortable using Terminal, then follow these steps:
– Open Terminal on your Macbook
– Type the command chflags hidden
– Now, simply drag and drop the folder from Finder to Terminal that you want to hide and press Enter.
What is the shortcut to hide a file on Mac?
Command + Shift + Period(.) is the Keyboard Shortcut for hiding files in macOS. Pressing down Command + Shift + Period in the file system of Mac OS will hide or show hidden files.
How to Unhide Files on Mac
Now that you know how to hide files on Mac, check how to unhide them. Unhiding files is as simple as doing the opposite of the method you used to hide the file.
For, example, you can remove the dot (.) in the file name, or type chflags nohidden followed by the file location in the terminal.
However, you can use third-party tools that let you manage hidden files easily. ForkLife and Commander One are excellent file managers. They have a show hidden files tool with which you can find and unhide hidden files on your Mac.
Why you should hide files on Mac
There are two main reasons for hiding files on Mac, they are,
For Privacy: If you want certain files and folders to be protected from privy eyes, you can hide them. This is useful if you have others borrowing your computer.
For Security: To prevent accidental deletion of important system files. This is done by default, your Mac hides important files that are needed for booting and functioning your Mac. So these files are hidden by default, but if you find other such important files, you can hide them yourself too.
Check out how to hide files on Mac in our guide.
How to hide and unhide a folder on Mac?
To hide or unhide a folder on your Mac you will have to follow the same steps you’ use to hide a file on Mac. you can choose to go with the keyboard shortcut Cmd+Shift+ or use the Terminal to hide and unhide a folder.
Also Read:
- How to Fix MacBook Screen Glitching & Flickering
- Wi-fi won’t turn on on Mac, How to Fix
- MacBook Stuck in Recovery: How To Fix
Alan Urban is the Editor-in-chief of Stupid Apple Rumours and often proclaims that he’s ” Apple’s number one fan.”
In addition to keeping up with the latest Apple news, he also reviews Apple products and creates user-friendly guides. When not subjecting Apple Devices to crazy stress tests, he’s usually playing games on Apple Arcade

