Fed up with your iPhone locking itself every time you set it idle? Check out our guide on how to change Auto-Lock on iPhone to avoid this issue.
I am sure that you would have noticed by now that your iPhone should lock itself when it is left idle for a while. This feature is known as Auto-Lock and there are multiple reasons why your iPhone is programmed to do this.
If you don’t like this feature or you think that your iPhone locks itself too soon, then there is a way to fiddle with Auto-Lock’s settings and tune it to your liking. This article will explain everything related to the Auto-Lock feature.
To quickly change Auto-Lock on your iPhone, do this, Go to Settings -> Tap Display & Brightness -> Tap Auto-Lock -> Choose Never to turn off Auto-Lock or change the time as needed.
However, there is more to the Auto-Lock feature on iPhone. By the end of the article, you will know why Auto-Lock exists, how to personalize it, and how to fix some issues related to it. Read on to know more about changing Auto-Lock on your iPhone and how to troubleshoot Auto lock not working on iOS 17.
Related: How to Set Up Siri on the iPhone
How to Change Auto-Lock on iPhone?
Table of Contents
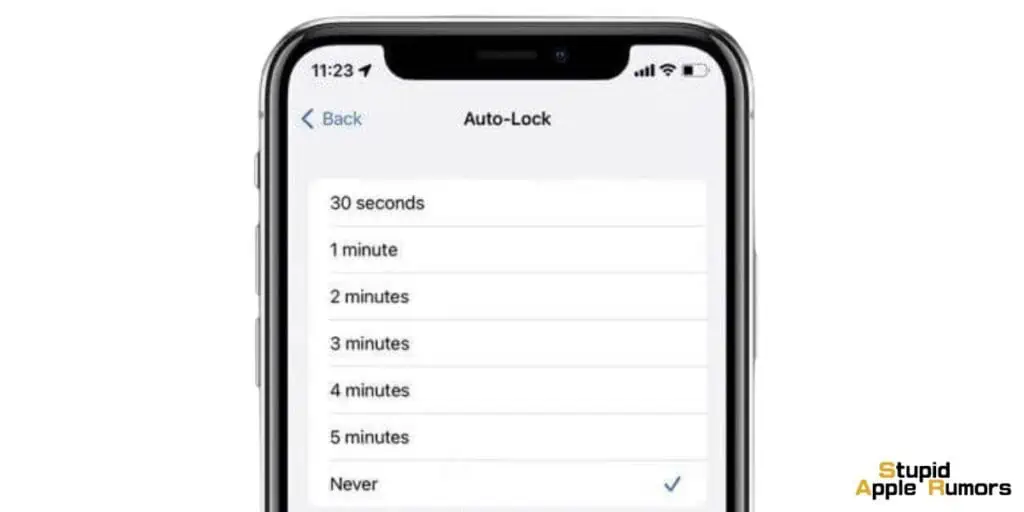
To change the auto-lock on your iPhone, follow these steps:
- Open the Settings app.
- Tap Display & Brightness.
- Scroll down and tap Auto-Lock.
- Select the desired auto-lock time from the following options:
- 30 seconds
- 1 minute
- 2 minutes
- 5 minutes
- Never
If you choose Never, your iPhone’s screen will remain on until you lock it manually.
Please note that if you have Low Power Mode enabled, the Auto-Lock setting will be forced to 30 seconds. To change this, you will need to disable Low Power Mode.
What is Auto-Lock on iPhone?
Auto-Lock is a feature on iPhone that dims the screen after a set amount of time. This is done to extend battery life and prevent others from accessing your iPhone.
You can set Auto-Lock to activate after a few seconds or minutes as needed. You can also disable it completely if needed. This is similar to a computer going to sleep after a set amount of time.
We recommend auto-lock for all iPhones, as it improves battery life and security, however, some might not like it. This article explains how to change auto-lock on iPhone which includes, turning it on/off, extending time, and more.
Why does Auto-Lock exist on the iPhone?
So now that you know Auto-Lock is a feature that automatically locks your iPhone, why does an iPhone do it though? Almost all smartphones do this and there are a few reasons.
One of the reasons is that it is done as a security measure because if your iPhone is unlocked and if you are not near it, there’s a chance that people might snoop or do something malicious. So if your iPhone Auto-Locks itself, it will be safe even when you are not near it.
Another reason why iPhone Auto-Locks itself is to preserve battery life. When your iPhone Auto-Locks, the screen goes to sleep as well and suspends the background tasks, this will save battery life. So if you were using your iPhone and maybe fell asleep, it will auto-Lock after some time to save battery life.
However, the same can be irritating in some cases, as your iPhone can go into Auto-Lock frequently even when you don’t want it to. And in such cases, you can change the Auto-Lock settings to your liking. YOu will find details on how to change Auto-Lock on iPhone below.
How to Change Auto-Lock on iPhone
Auto-Lock is a useful feature, but by default it only lets your iPhone stay idle for 30 seconds, which is too low. This can be frustrating if it kept locking itself when you are not done using it.
Thankfully, you can change Auto-Lock settings if needed. You can either turn it off completely or change the amount of time before your iPhone locks itself up.
Continue reading to know more about how to change Auto-Lock and other related issues.
How to turn off Auto-Lock on your iPhone
If you don’t want your iPhone to lock itself, then you can turn off Auto-Lock. By default, Auto-Lock is set to 30 seconds on your iPhone, which means your iPhone will lock itself if it’s been left idle for 30 seconds. But you can turn off this feature and let your iPhone be idle for however long you want.
To turn off Auto-Lock on your iPhone, follow these steps,
Step 1 From the Home Screen, open the Settings app on your iPhone.
Step 2 In here, tap on Display & Brightness.

Step 3 Tap on the Auto-Lock option.
Step 4 Now, choose the Never option.
This will turn off Auto-Lock for your iPhone and your iPhone will stay unlocked unless you press the Side button. Remember that if you fail to lock your phone manually every time, it can be a security concern and even drain your iPhone’s battery faster compared to before. So it is advised to have Auto-Lock set unless you think it’s a hindrance for you.
Changing Auto Lock Time on iOS 6 and Older
If you have an older iPhone then changing accessing auto-lock settings can be a bit different. Here’s how you can change auto-lock on older iPhones,
Step 1 Open the Settings app on your iPhone
Step 2 Select General.
Step 3 Tap on the Auto-Lock option.
Step 4 Set a time as needed.
How to Change Auto-Lock Time on iPhone
As I mentioned before, the default Auto-Lock time for your iPhone is 30 seconds, and if needed you can change this. You can increase or decrease this time and your iPhone will go to sleep and lock itself automatically based on that.
To change the Auto-Lock time on Your iPhone, do the following,
Step 1 Open the Settings app on your iPhone.

Step 2 Now, choose the Display & Brightness section.

Step 3 Tap on Auto-Lock.
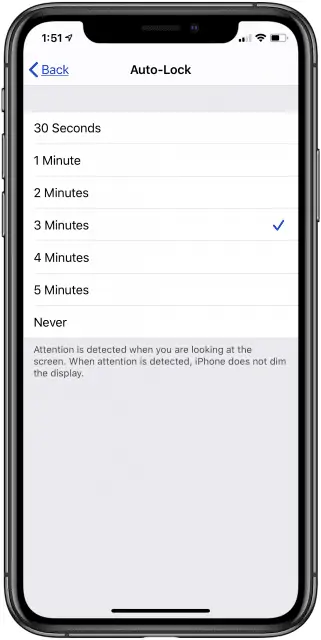
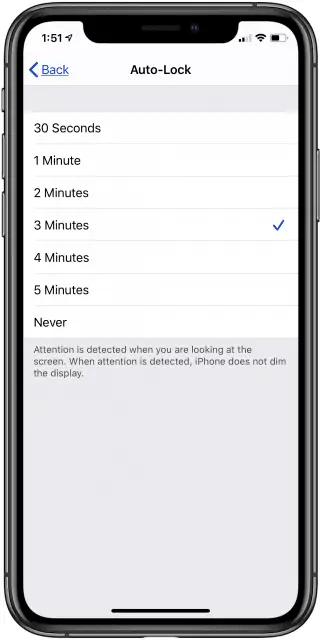
Step 4 Now set the timer based on your preference, you can choose from the following time settings,
- 30 Seconds
- 1 Minute
- 2 Minutes
- 3 Minutes
- 4 Minutes
- 5 Minutes
- Never
Once you do this, your iPhone will lock itself if it’s idle for the amount of time you chose. For example, if you choose 1 minute, your iPhone will have its screen on and will stay unlocked for 1 minute even when it’s idle, but after that, it will lock itself and turn off the screen.
If the Auto-Lock feature is greyed out and you can’t change it, don’t fret, there is an easy fix for this. Read on to know more.
How to Fix a Grayed-Out Auto-Lock on Your iPhone
The Auto-Lock feature being greyed out is not a problem or an issue, it’s just a feature of iPhones and even iPads. The Auto-Lock feature is greyed out whenever your iPhone is on Low Power Mode, and your iPhone or iPad does this to save power.
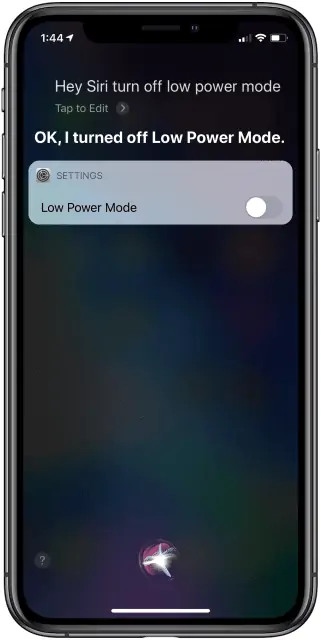
When your iPhone is on Low Power Mode, it sets the Auto-Lock time to 30 seconds and greys out the option to conserve battery life. To be able to change your Auto-Lock option, all you have to do is turn off Low Power Mode. You can either do this by using Siri or by going into the Settings app,
To turn off Low Power Mode using Siri, just say “Hey Siri, turn off Low Power mode.
To turn off Low Power Mode in Settings, follow these steps
Step 1 Open the Setting app on your iPhone.
Step 2 Scroll down and tap on Battery.
Step 3 Now, toggle off the Low Power Mode option.
Once you have turned off Low Power Mode, you will be able to open Auto-Lock settings and change it as you like. You can increase, decrease or completely turn off the Auto-Lock setting on your iPhone.
How to Fix “iPhone Keeps Going to Lock Screen” Bug
Users have noted that there is an issue with iPhones. iPhone screens go black, then they display a spinning wheel in the center of the screen, and the iPhone locks itself. This bug has been speculated to be caused by the Headspace app, some Reddit users discovered that deleting the app and restarting your iPhone fixes this issue.
This issue might be present even if you don’t have the Headspace app on your iPhone, or in case you don’t want to delete the app, then there is a potential solution for that as well. So to fix the “iPhone Keeps Going to Lock Screen” bug, follow these steps,
Step 1 Open the Settings app on your iPhone.

Step 2 Tap on Notifications.
Step 3 Tap on the arrow next to an app.
Step 4 Now, toggle off the Allow Notifications option for the app. Repeat this for all apps on your iPhone.
Step 5 Now, you have to update your iPhone to the latest iOS version. If already updated, restart your iPhone and then go back and toggle on Allow Notifications for all apps you need.
This should have fixed the “iPhone Keeps Going to Lock Screen” bug on your iPhone. If in case the issue persists, then contact Apple for support.
Update iPhone to fix Auto-Lock bugs
If you are facing any bugs with respect to Auto-Lock on your iPhone, then updating your iPhone might fix it. Follow these steps to update your iPhone,
Step 1 Select the Settings app.
Step 2 Select the General.
Step 3 Scroll to the bottom and select Software Update.
Step 4 If a software update is available, tap on Download and Install.
How to turn Lock/Unlock on and off on your iPhone
If you have the official Leather Folio case for your iPhone or any supported flip/folio case, you might have noticed that these cases will put your iPhone to sleep and lock them when you close the case. And the iPhone will also wake up when you open the cover, which is a neat feature. But if you don’t like this feature, you can turn it off in the settings. To do this, follow the below steps,
Step 1 Launch the Settings app on your iPhone.

Step 2 Tap on the Display & Brightness option.
Step 3 Toggle on/off the Lock/Unlock switch as needed.
When this setting is on, your iPhone will lock itself when you close the case and when it is off, this feature won’t work. I couldn’t personally turn off this setting as it is a useful and convenient feature but if you need it, then it’s available.
How to Fix Auto Lock not Working on iOS 17?
If you’re experiencing issues with Auto Lock on your iPhone after updating to Beta iOS 17, as noted by some Reddit users, there are several steps you can take to troubleshoot and potentially resolve the problem.
Here are eight different fixes you can try:
Fix 1: Re-enable Auto-Lock on iPhone/iPad
- Open Settings on your iPhone/iPad.
- Select Display & Brightness.
- Tap on Auto-Lock and choose the desired time interval for the screen to turn off automatically.
Fix 2: Turn Off AssistiveTouch on Your iPhone
- Navigate to Settings.
- Go to General and then Accessibility.
- Select AssistiveTouch and toggle the switch to turn it off.
Fix 3: Disable Low Power Mode
- Open Settings and go to Battery.
- Toggle off the switch next to Low Power Mode.
Fix 4: Reset All Settings on iPhone
- Open Settings and tap on General.
- Scroll down and select Reset.
- Tap Reset All Settings and enter your screen passcode.
(Note: This will reset all settings on your iPhone, so make sure to back up your data before proceeding.)
Fix 5: Turn off Passcode and Turn Passcode Back On
- Navigate to Settings.
- Go to Touch ID & Passcode (or Face ID & Passcode on newer models).
- Enter your screen passcode and toggle off the passcode.
- Restart your iPhone and then re-enable the passcode in the same menu.
Fix 6: Force Restart iPhone
- Press and immediately release the Volume Up button.
- Press and immediately release the Volume Down button.
- Press and hold the Power button until the Apple logo appears.
How to Change Auto-Lock on iPhone – Conclusion
Now, you know everything about Auto-Lock. You know its functions, why it’s present, and how to change Auto-Lock on iPhone. To put it in simple terms, it’s a feature that locks your iPhone when left idle. It is done as a security and as battery-saving measure.
If you don’t like the default Auto-Lock timing of 30 seconds, you can increase or even turn off Auto-Lock completely if needed.
If you are someone like me who manually locks my phone every time I am done using it, then you won’t need Auto-Lock. But if you are someone who forgets to lock your iPhone, then you might want to let Auto-Lock on and set it to a low amount of time. This ensures security and saves battery life on your iPhone.
How to Change Auto-Lock on iPhone – FAQs
Why is Auto-lock setting grayed out?
The Auto-Lock feature being greyed out is not a problem, so don’t worry. It is a feature of iPhones and iPads. When the Auto-Lock feature is greyed out then your iPhone is on Low Power Mode, and your iPhone or iPad does this to save power. You can easily turn off Low Power Mode to get access to Auto-Lock again.
What is Raise to Wake?
Raise to Wake is a feature that makes the screen automatically light up when you pick up your iPhone from a table or pocket. You don’t have to push any button for your iPhone to light up when Raise to Wake is turned on. Raise to Wake also can be used over Auto-Lock to easily access your iPhone while still maintaining privacy.
How to turn on Raise to Wake?
Follow these steps to turn on Raise to Wake,
Step 1 Open the Settings app on your iPhone.
Step 2 Tap on Display & Brightness.
Step 3 Scroll down to Raise to Wake and the toggle on the switch next to it.
Also Read:

